


ODM Cloud Series — Crawl / Walk / Run · Article 6 of 10
From zero to a self-hosted cloud processing pipeline
This series builds a production WebODM setup from scratch — starting with the ecosystem fundamentals, moving through AWS spot instance setup and cost control, and finishing with auto-scaling, security, and a head-to-head comparison with commercial platforms. Each article stands alone; read in order to build the full stack.
Pricing note: AWS pricing, spot instance rates, and third-party software costs change frequently. All figures reflect rates as of April 2026 and should be verified against current pricing pages before making infrastructure decisions.
Processing is done. WebODM spits out a GeoTIFF orthomosaic, a point cloud, a DSM, and a report. Now what? Your client expects a deliverable. You could email them a zip file with 50 GB of data — assuming their email server doesn’t reject it. You could upload to Dropbox and pray it doesn’t timeout.
The approach that actually works at scale: a link. Client clicks, downloads what they need. Done.
Here’s the delivery workflow.
The Download Workflow From WebODM
WebODM stores outputs on the instance disk. Get them into S3 after processing so the instance doesn’t fill up.
Where WebODM Stores Outputs
WebODM runs in Docker. Processing outputs live in a Docker volume on your instance:
/webodm/app/media/project/{PROJECT_ID}/task/{TASK_ID}/
├── orthophoto.tif          # Final orthomosaic (GeoTIFF)
├── pointcloud.ply          # 3D point cloud (PLY format)
├── pointcloud.laz          # Compressed point cloud (LAZ)
├── dsm.tif                 # Digital surface model
├── dtm.tif                 # Digital terrain model (if generated)
├── mesh_model.zip          # Textured 3D mesh
├── report.pdf              # Processing report
└── logs/                   # Processing logs
You can grab these through the WebODM UI, but for automation or batch workflows, you want CLI access.
Download From WebODM to Local Storage
Via WebODM API (if you have network access to the instance):
# Get the project and task ID
PROJECT_ID=1
TASK_ID=1

# Authenticate and download
curl -X GET http://your-instance-ip:8000/api/projects/$PROJECT_ID/tasks/$TASK_ID/download/orthophoto.tif \
  --output orthophoto.tif \
  -H "Authorization: Token YOUR_WEBODM_API_TOKEN"
WebODM exposes an HTTP API. Authenticate with a token, then pull individual files or the whole task package.
Via SSH (simplest if you have SSH access):
# SSH into your instance
ssh -i your-key.pem ubuntu@your-instance-ip

# Find the WebODM output directory
ls -lh /webodm/app/media/project/1/task/1/

# Copy outputs to S3 from the instance (fast, no local download)
aws s3 cp /webodm/app/media/project/1/task/1/orthophoto.tif \
  s3://aerocartwright-odm-processing/projects/project-001-Smith-Property/outputs/ \
  --sse AES256

# Or sync entire task output
aws s3 sync /webodm/app/media/project/1/task/1/ \
  s3://aerocartwright-odm-processing/projects/project-001-Smith-Property/outputs/ \
  --exclude "logs/*" \
  --sse AES256
Syncing straight from instance to S3 is the fastest path — no local download, and the transfer is free within AWS.
Automate Outputs to S3 After Processing
Better yet, add a post-processing hook that uploads outputs automatically when a task finishes.
WebODM Task Callback (if using ClusterODX):
ClusterODX (formerly ClusterODM) supports webhooks. When processing finishes, it hits a Lambda function or HTTP endpoint you control. That endpoint copies outputs to S3.
# Lambda function triggered by ClusterODX webhook
import boto3
import requests
import json

s3_client = boto3.client('s3', region_name='us-east-2')

def lambda_handler(event, context):
    """
    Triggered when ClusterODX finishes processing.
    event contains project_id, task_id, status
    """

    project_id = event['project_id']
    task_id = event['task_id']
    nodeodx_url = event['nodeodx_url']  # URL of the NodeODX (formerly NodeODM) instance

    # Download outputs from NodeODX
    orthophoto_url = f"{nodeodx_url}/task/{task_id}/download/orthophoto.tif"

    # Get the file
    response = requests.get(orthophoto_url)

    # Upload to S3
    s3_key = f"projects/project-{project_id}/outputs/orthophoto.tif"
    s3_client.put_object(
        Bucket='aerocartwright-odm-processing',
        Key=s3_key,
        Body=response.content
    )

    # Send notification that upload is complete
    sns = boto3.client('sns')
    sns.publish(
        TopicArn='arn:aws:sns:us-east-2:ACCOUNT:processing-complete',
        Subject=f'Project {project_id} outputs uploaded to S3',
        Message=f'Orthophoto available at s3://{s3_key}'
    )

    return {
        'statusCode': 200,
        'body': json.dumps('Outputs uploaded to S3')
    }
Deploy this as a Lambda function and point ClusterODX at it. Outputs flow to S3 automatically. Nothing to download locally.
Presigned URLs: The Simple Delivery Method
Outputs in S3? Generate presigned URLs and send them to your client.
Generate URLs for a Single Project
PROJECT_ID="project-001-Smith-Property"
BUCKET="aerocartwright-odm-processing"

# Generate 7-day presigned URLs for all outputs
for file in orthophoto.tif pointcloud.laz dsm.tif report.pdf; do
  URL=$(aws s3 presign "s3://$BUCKET/projects/$PROJECT_ID/outputs/$file" --expires-in 604800)
  echo "$file: $URL"
done
Output:
orthophoto.tif: https://aerocartwright-odm-processing.s3.us-east-2.amazonaws.com/projects/project-001-Smith-Property/outputs/orthophoto.tif?X-Amz-Algorithm=...
pointcloud.laz: https://aerocartwright-odm-processing.s3.us-east-2.amazonaws.com/projects/project-001-Smith-Property/outputs/pointcloud.laz?X-Amz-Algorithm=...
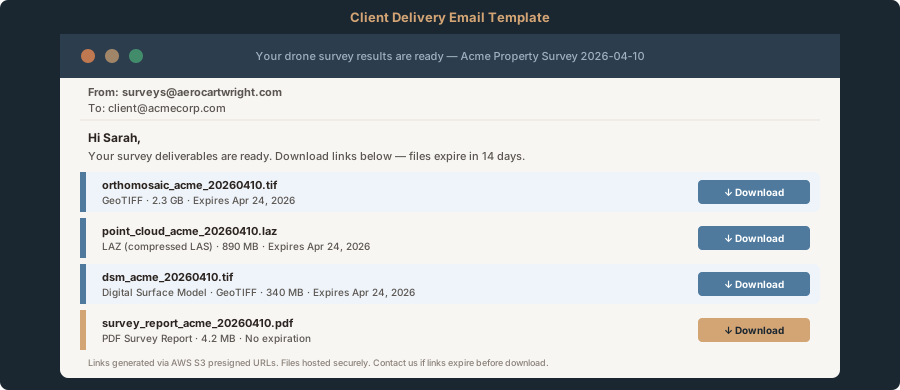
Create a Professional Delivery Email Template
<!DOCTYPE html>
<html>
<head>
    <style>
        body { font-family: Arial, sans-serif; color: #333; }
        .container { max-width: 600px; margin: 0 auto; padding: 20px; }
        .header { background: #2C3E4D; color: white; padding: 20px; border-radius: 5px; }
        .file-section { margin: 20px 0; padding: 15px; background: #f5f5f5; border-left: 4px solid #D4A574; }
        .download-link { color: #0066cc; text-decoration: none; font-weight: bold; }
        .expiration { font-size: 12px; color: #666; margin-top: 10px; }
    </style>
</head>
<body>
<div class="container">
    <div class="header">
        <h1>Drone Mapping Deliverables</h1>
        <p>Project: Smith Property Survey | Date: May 15, 2026</p>
    </div>

    <h2>Download Your Files</h2>
    <p>Your orthomosaic and supporting data are ready. Click the links below to download.</p>

    <div class="file-section">
        <h3>Primary Deliverable</h3>
        <p><strong>Orthophoto (GeoTIFF)</strong> - Georeferenced aerial map</p>
        <p><a class="download-link" href="[PRESIGNED_URL_ORTHOPHOTO]">Download orthophoto.tif</a> (12 GB)</p>
        <p style="font-size: 12px; color: #666;">Recommended for GIS analysis, overlay with CAD/design software, area measurement</p>
    </div>

    <div class="file-section">
        <h3>Supporting Data</h3>
        <p><strong>Point Cloud (LAZ)</strong> - 3D point cloud, compressed</p>
        <p><a class="download-link" href="[PRESIGNED_URL_POINTCLOUD]">Download pointcloud.laz</a> (4 GB)</p>
        <p style="font-size: 12px; color: #666;">Open in CloudCompare, ArcGIS Pro, or any LAZ viewer</p>
    </div>

    <div class="file-section">
        <p><strong>Digital Surface Model (GeoTIFF)</strong> - Elevation data</p>
        <p><a class="download-link" href="[PRESIGNED_URL_DSM]">Download dsm.tif</a> (6 GB)</p>
    </div>

    <div class="file-section">
        <p><strong>Processing Report (PDF)</strong> - Metadata and statistics</p>
        <p><a class="download-link" href="[PRESIGNED_URL_REPORT]">Download report.pdf</a> (2 MB)</p>
    </div>

    <div class="expiration">
        <p>Links expire: [DATE], [TIME]</p>
        <p>Need more time? Reply to this email and we'll extend your access.</p>
    </div>

    <hr>
    <p><strong>Questions?</strong><br>
    Email: [email protected]<br>
    File metadata, accuracy details, and usage guidelines in the included processing report.
    </p>
</div>
</body>
</html>
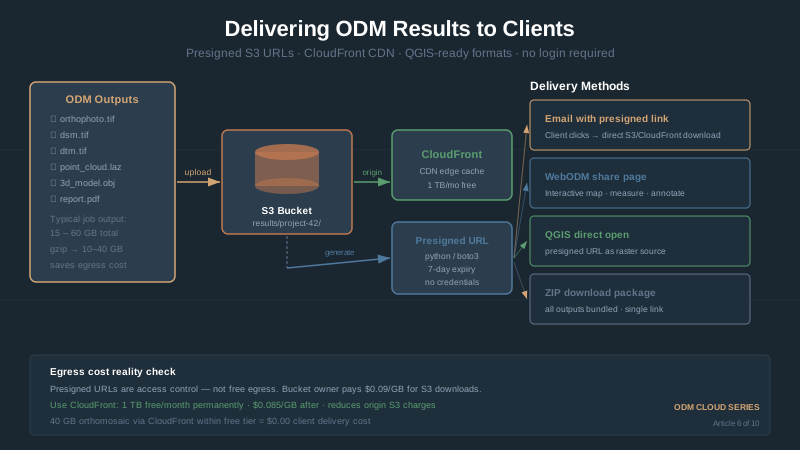
Fill in the URLs, send to client. They download straight from S3 — presigned URLs control access without requiring AWS credentials, but standard S3 egress fees ($0.09/GB) still apply to the bucket owner. Use CloudFront (1 TB/month free tier) to reduce egress costs at scale.
CloudFront: Free CDN for Faster Downloads
If multiple people download the same file, put CloudFront in front of S3. AWS’s CDN caches files at edge locations worldwide and serves from the nearest one. First 1 TB per month free. After that: $0.085/GB (actually cheaper than S3’s direct $0.09/GB).
Create a CloudFront Distribution
# Create distribution pointing to S3 bucket
aws cloudfront create-distribution --distribution-config '{
  "CallerReference": "'"$(date +%s)"'",
  "Comment": "ODM outputs CDN",
  "S3OriginConfig": {
    "OriginAccessIdentity": ""
  },
  "Origins": {
    "Quantity": 1,
    "Items": [
      {
        "Id": "S3Origin",
        "DomainName": "aerocartwright-odm-processing.s3.us-east-2.amazonaws.com",
        "S3OriginConfig": {
          "OriginAccessIdentity": ""
        }
      }
    ]
  },
  "DefaultCacheBehavior": {
    "TargetOriginId": "S3Origin",
    "ViewerProtocolPolicy": "redirect-to-https",
    "TrustedSigners": {
      "Enabled": false,
      "Quantity": 0
    },
    "ForwardedValues": {
      "QueryString": false,
      "Cookies": {
        "Forward": "none"
      }
    },
    "MinTTL": 0
  },
  "Enabled": true
}'
This creates a CloudFront domain (something like d123abc.cloudfront.net). Requests get routed through the edge network, cached, and delivered fast.
For presigned URLs through CloudFront, replace the S3 domain with your CloudFront domain:
Before: https://aerocartwright-odm-processing.s3.us-east-2.amazonaws.com/projects/.../orthophoto.tif?X-Amz-Algorithm=...

After: https://d123abc.cloudfront.net/projects/.../orthophoto.tif?X-Amz-Algorithm=...
Presigned signature still works. Client downloads from CloudFront instead of S3 directly. Faster for them, same cost for you (free tier covers most usage).
Static Website Hosting: Public Maps
Want to publish an orthomosaic as a public web map? S3 can host it as a static website.
Enable Static Website Hosting on S3
# Enable static website hosting
aws s3 website s3://aerocartwright-odm-maps \
  --index-document index.html \
  --error-document error.html

# Make bucket publicly readable
aws s3api put-bucket-policy --bucket aerocartwright-odm-maps \
  --policy '{
    "Version": "2012-10-17",
    "Statement": [{
      "Effect": "Allow",
      "Principal": "*",
      "Action": "s3:GetObject",
      "Resource": "arn:aws:s3:::aerocartwright-odm-maps/*"
    }]
  }'
S3 now serves your bucket as a website at http://aerocartwright-odm-maps.s3-website-us-east-2.amazonaws.com.
Embed an Interactive Map Using Leaflet
Create an index.html that displays the orthomosaic as an interactive map:
<!DOCTYPE html>
<html>
<head>
    <meta charset="utf-8" />
    <title>Drone Orthomosaic Viewer</title>
    <meta name="viewport" content="width=device-width, initial-scale=1.0">
    <link rel="stylesheet" href="https://cdnjs.cloudflare.com/ajax/libs/leaflet/1.9.4/leaflet.min.css" />
    <script src="https://cdnjs.cloudflare.com/ajax/libs/leaflet/1.9.4/leaflet.min.js"></script>
    <style>
        body { margin: 0; padding: 0; }
        #map { position: absolute; top: 0; bottom: 0; width: 100%; }
    </style>
</head>
<body>
<div id="map"></div>

<script>
    // Initialize map at the orthomosaic's location
    const map = L.map('map').setView([40.2672, -82.8711], 16);

    // Add base layer
    L.tileLayer('https://{s}.tile.openstreetmap.org/{z}/{x}/{y}.png', {
        attribution: '© OpenStreetMap contributors',
        maxZoom: 19
    }).addTo(map);

    // Load orthomosaic as GeoTIFF overlay
    // Using Leaflet-Geotiff plugin (you need to include this library)
    fetch('orthophoto.tif')
        .then(response => response.arrayBuffer())
        .then(data => {
            const geoTiff = new GeoTIFF(data);
            // Display as raster overlay
            // (Note: actual implementation requires Leaflet-Geotiff plugin)
        });
</script>
</body>
</html>
Upload this HTML to S3. Clients visit the URL and see an interactive map. No server to maintain. S3 hosting costs pennies per month.
File Format Guide: Which Format for Which Client
WebODM outputs GeoTIFF by default. Your client might need something different. Here’s what to use when:
GeoTIFF (orthophoto.tif)
The default choice for GIS professionals, engineers, and surveyors. Georeferenced, lossless, and opens in everything — QGIS, ArcGIS, AutoCAD, Pix4D, Metashape. Files run 12-40 GB uncompressed (3-12 GB as Cloud Optimized GeoTIFF). Deliver via presigned URL. Use this almost always.
KMZ (Google Earth Format)
For non-technical clients — project managers, real estate, government folks. Opens in Google Earth Pro (free), looks great, and anyone can navigate it. Usually 1-3 GB compressed.
gdal_translate -of KMZ orthophoto.tif orthophoto.kmz
Or in QGIS: Load file, right-click layer, Export, KMZ. Use this when your client doesn’t have GIS software — “open in Google Earth Pro” is something anyone can follow.
Cloud Optimized GeoTIFF (COG)
Same data as a regular GeoTIFF, but with a tiled internal structure so clients only load the area they’re zoomed into — not the full 40 GB. Essential for web maps and files over 20 GB.
gdal_translate -of COG -co COMPRESS=deflate orthophoto.tif orthophoto_cog.tif
PDF Report
Everyone can read a PDF. WebODM generates report.pdf automatically with orthomosaic preview, metadata, and processing stats. Good for non-technical stakeholders and project documentation. You can also generate a custom one:
from reportlab.lib import colors
from reportlab.lib.pagesizes import A4
from reportlab.platypus import SimpleDocTemplate, Table, Paragraph, Image, PageBreak
from datetime import datetime

doc = SimpleDocTemplate("orthomosaic_report.pdf", pagesize=A4)
story = []

# Title
story.append(Paragraph("Drone Mapping Report", style=styles['Heading1']))
story.append(Paragraph(f"Smith Property Survey", style=styles['Normal']))
story.append(Paragraph(f"Generated: {datetime.now().strftime('%Y-%m-%d')}", style=styles['Normal']))

# Metadata table
data = [
    ['Project ID', 'project-001-Smith-Property'],
    ['Flight Date', 'May 15, 2026'],
    ['Image Count', '450'],
    ['Ground Resolution', '2.2 cm/pixel'],
    ['Horizontal Accuracy', '+/-2-5 meters (consumer GPS)'],
]
t = Table(data, colWidths=[3 * cm, 6 * cm])
t.setStyle(TableStyle([('BACKGROUND', (0, 0), (-1, 0), colors.grey),
                       ('TEXTCOLOR', (0, 0), (-1, 0), colors.whitesmoke),
                       ('ALIGN', (0, 0), (-1, -1), 'LEFT'),
                       ('FONTNAME', (0, 0), (-1, 0), 'Helvetica-Bold'),
                       ('FONTSIZE', (0, 0), (-1, 0), 14),
                       ('BOTTOMPADDING', (0, 0), (-1, 0), 12),
                       ('BACKGROUND', (0, 1), (-1, -1), colors.beige),
                       ('GRID', (0, 0), (-1, -1), 1, colors.black)]))
story.append(t)

# Include orthophoto preview
story.append(PageBreak())
story.append(Paragraph("Orthophoto Preview", style=styles['Heading2']))
story.append(Image('orthophoto_preview.png', width=20*cm, height=15*cm))

doc.build(story)
Use for client handoff, archival, or when you need a single document summarizing the project.
LAS/LAZ Point Cloud
Industry standard for engineers, surveyors, and 3D modelers. Includes intensity, classification, and RGB. LAZ compressed runs 2-8 GB; uncompressed LAS is 8-20 GB. WebODM outputs PLY format — convert via CloudCompare (File, Save As, LAS) or pdal. Send this when clients are doing civil engineering, volumetric analysis, or classification work.
Embedding Orthomosaics in Client Reports
Sometimes the client wants the orthomosaic embedded in a Word doc or PowerPoint they’re putting together.
Export Georeferenced Preview
GeoTIFFs don’t embed in Word. You need a regular image (PNG/JPG) first:
# Convert GeoTIFF to PNG (loses georeferencing, just the image)
gdal_translate -of PNG orthophoto.tif orthophoto_preview.png

# Or with JPEG compression for smaller file
gdal_translate -of JPEG orthophoto.tif orthophoto_preview.jpg -co QUALITY=90
Drop this into Word or PowerPoint. If they need actual measurements or GIS analysis, provide the GeoTIFF separately.
Embed in Microsoft Word Report
from docx import Document
from docx.shared import Inches, Pt, RGBColor
from docx.enum.text import WD_ALIGN_PARAGRAPH

doc = Document()

# Title
title = doc.add_heading('Drone Mapping Report', 0)
title.alignment = WD_ALIGN_PARAGRAPH.CENTER

# Project info
doc.add_paragraph(f'Project: Smith Property Survey')
doc.add_paragraph(f'Date: May 15, 2026')
doc.add_paragraph(f'Flight Duration: 22 minutes')
doc.add_paragraph(f'Images Captured: 450')

# Orthophoto
doc.add_heading('Orthophoto', level=2)
doc.add_paragraph('High-resolution aerial map generated from 450 overlapping images.')
doc.add_picture('orthophoto_preview.jpg', width=Inches(6.5))

last_paragraph = doc.paragraphs[-1]
last_paragraph.alignment = WD_ALIGN_PARAGRAPH.CENTER

# Metadata
doc.add_heading('Specifications', level=2)
table = doc.add_table(rows=6, cols=2)
table.style = 'Light Grid Accent 1'

table.cell(0, 0).text = 'Ground Resolution (GSD)'
table.cell(0, 1).text = '2.2 cm/pixel'

table.cell(1, 0).text = 'Horizontal Accuracy'
table.cell(1, 1).text = '+/-2-5 meters (consumer GPS, no GCPs)'

table.cell(2, 0).text = 'Coordinate System'
table.cell(2, 1).text = 'UTM Zone 17N (WGS84)'

table.cell(3, 0).text = 'Data Format'
table.cell(3, 1).text = 'GeoTIFF (georeferenced)'

table.cell(4, 0).text = 'File Size'
table.cell(4, 1).text = '12 GB'

table.cell(5, 0).text = 'Processing Time'
table.cell(5, 1).text = '3.5 hours'

# Notes
doc.add_heading('Usage Notes', level=2)
doc.add_paragraph('This orthomosaic is georeferenced and can be imported into any GIS software (QGIS, ArcGIS, AutoCAD). Measurements are accurate within the GSD — approximately 2.2 cm per pixel resolution. Accuracy without ground control points is +/-2-5 meters horizontally. If survey-grade accuracy is required, contact us about deploying ground control points on future flights.')

doc.save('Smith_Property_Report.docx')
Opens clean in Word. Client adds their notes and distributes.
Delivery Checklist
Before sending files to client:
- Orthomosaic downloaded from WebODM and stored in S3
- Point cloud, DSM, and report also in S3
- Presigned URLs generated (7-day expiration)
- Email template with download links created
- KMZ or preview image created for non-GIS clients
- Processing report reviewed for accuracy and completeness
- Files spot-checked (open orthophoto in QGIS, verify geolocation)
- Client contact info verified
- Presigned URLs sent via secure email (not Slack, not Teams chat)
- Follow-up: Ask client to confirm download successful within 24 hours
Common Delivery Issues and Fixes
Client says link is broken:
Presigned URLs expire. Check expiration time. If expired, generate new URLs.
aws s3 presign s3://bucket/key --expires-in 604800 # 7 days
Client’s GIS software can’t open the GeoTIFF:
Nine times out of ten, it’s a projection issue. Check the CRS metadata:
gdalinfo orthophoto.tif | grep -A5 "Coordinate System"
If no CRS, reproject:
gdalwarp -t_srs EPSG:4326 orthophoto.tif orthophoto_wgs84.tif
File transfer fails (connection timeout):
Large files (12+ GB) choke on unstable connections. Use a presigned URL with resumable download capability, or split the file.
Client wants to re-download after expiration:
Generate new presigned URLs. Keep outputs in S3 for at least 30 days post-delivery, then archive or delete according to your retention policy.
Bottom Line
Move outputs from WebODM to S3 right after processing. Generate presigned URLs with 7-day expiration. Send the delivery email. Client clicks, downloads from S3. Note that standard S3 egress fees ($0.09/GB) apply to the bucket owner regardless of how files are accessed — presigned URLs control who can download, not what you’re charged. Put CloudFront in front of S3 to take advantage of the 1 TB/month free egress tier.
GIS clients get GeoTIFF. Non-technical folks get KMZ for Google Earth. Documentation gets PDF. 3D work gets LAZ.
Presigned URLs beat every other delivery method I’ve tried. No infrastructure to maintain, no file size limits, instant client access.
For next steps, see Walk 7: Monitoring & Alerts — Know When Your Job Is Done for automating notifications when processing completes.