


ODM Cloud Series — Crawl / Walk / Run · Article 4 of 10
From zero to a self-hosted cloud processing pipeline
This series builds a production WebODM setup from scratch — starting with the ecosystem fundamentals, moving through AWS spot instance setup and cost control, and finishing with auto-scaling, security, and a head-to-head comparison with commercial platforms. Each article stands alone; read in order to build the full stack.
Pricing note: AWS pricing, spot instance rates, and third-party software costs change frequently. All figures reflect rates as of April 2026 and should be verified against current pricing pages before making infrastructure decisions.
You’ve spun up an EC2 instance with WebODM running on it. Now the real work starts: getting your drone images in, managing them without burning a hole in your AWS bill, and delivering results to clients without keeping results on the instance disk forever.
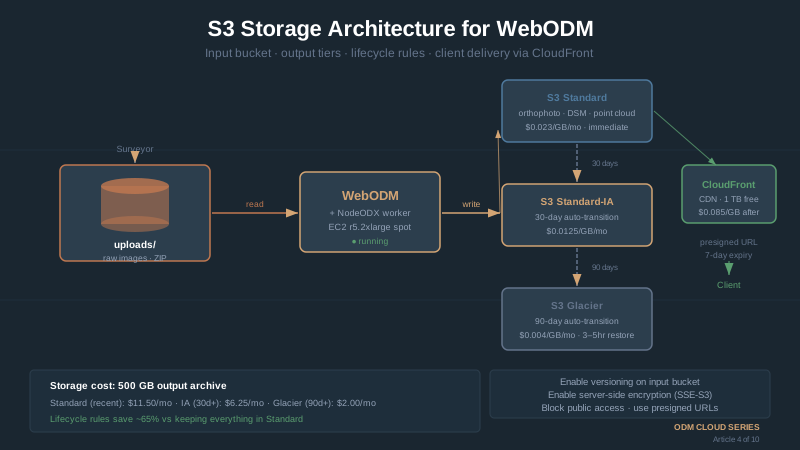
S3 is where this happens. A well-organized bucket ingests images before processing, stores outputs after, and delivers files via presigned URLs. Get the structure right and storage costs drop 60 percent. Get it wrong and you’re paying $0.09 per gigabyte to download the same orthomosaic three times.
Setting Up Your S3 Bucket for WebODM Workflows
Keep it simple. Your bucket just needs to be predictable.
Create the Bucket
Open the AWS Console, go to S3, create a new bucket. Name it something descriptive — aerocartwright-odm-processing or mycompany-drone-data. Don’t enable public access. This is internal infrastructure, not a website.
Region choice matters for cost and speed. If you’re running WebODM in us-east-2 (Ohio), put your S3 bucket in the same region. Data transfer between EC2 and S3 in the same region is free. Cross-region S3-to-EC2 transfers still incur data transfer charges ($0.01–$0.02/GB) — keep both resources in the same region to avoid this.
# CLI command to create the bucket in us-east-2
aws s3 mb s3://aerocartwright-odm-processing --region us-east-2
Set Up Folder Structure
Inside your bucket, create this folder structure:
s3://aerocartwright-odm-processing/
├── projects/
│   ├── project-001-Smith-Property/
│   │   ├── images/
│   │   └── outputs/
│   ├── project-002-Construction-Site/
│   │   ├── images/
│   │   └── outputs/
│   └── project-003-Survey-Work/
│       ├── images/
│       └── outputs/
├── archive/
│   ├── 2026-01/
│   ├── 2026-02/
│   └── 2026-03/
└── temp/
    └── (intermediate files, auto-deleted after 7 days)
What each folder does:
projects/— Active jobs, either processing or queued. Each project gets a subfolder with client name or job ID. Images inimages/, outputs inoutputs/.archive/— Completed projects older than 30 days. Lifecycle rules move them here automatically (see below). Cheaper storage tier, still accessible when you need them.temp/— Intermediate WebODM files. Auto-deletes after 7 days so they don’t pile up.
You won’t manually create these folders. S3 has no “real” folders—just prefixes. Create them as you upload files:
# Upload images to project folder
aws s3 cp /local/path/to/images s3://aerocartwright-odm-processing/projects/project-001-Smith-Property/images/ --recursive

# List what's in the bucket
aws s3 ls s3://aerocartwright-odm-processing/ --recursive --human-readable
Uploading Images to S3 for Processing
Three ways this plays out: a single small job from your laptop, a large batch after a week of fieldwork, or automated uploads from cloud instances.
Scenario 1: One Project, ~500 Images, Your Laptop
You flew a site. 450 JPEG images on your laptop, roughly 8 GB total. Upload them to S3.
Using the AWS CLI (recommended):
# Configure AWS CLI with your credentials (one-time setup)
aws configure

# Upload the entire folder
aws s3 sync /Users/eric/Documents/Flight_2026-05-15 \
  s3://aerocartwright-odm-processing/projects/project-001-Smith-Property/images/ \
  --delete

# Monitor progress
# The --delete flag removes files from S3 if they're no longer on your laptop (prevents duplicates)
Time estimate: 8 GB at typical 10 Mbps upload speed = 11 minutes. If your upload is slower (rural areas), plan accordingly.
Using the AWS Console (simpler but slower):
Open the Console, go to S3, find aerocartwright-odm-processing. Click “Upload”, select your images folder. Drag and drop works. Fine for small jobs, but painfully slow for large batches — stick with CLI for regular workflows.
Scenario 2: Large Batch, ~2,000 Images, Processing Multiple Sites
You’ve got week’s worth of flight data — multiple sites, thousands of images across many folders. You could upload site-by-site, but batch upload is faster.
Create a local index first.
# On your laptop, create a manifest file listing all projects
find ~/Documents/Flight_Data -maxdepth 2 -name "*.JPG" -o -name "*.jpg" | sort > upload_manifest.txt

# Review the manifest to make sure paths are correct
cat upload_manifest.txt

# Upload everything to S3 in parallel (faster for large batches)
aws s3 sync ~/Documents/Flight_Data \
  s3://aerocartwright-odm-processing/projects/ \
  --storage-class STANDARD \
  --metadata "uploaded=$(date +%Y-%m-%d),operator=eric" \
  --recursive
The --metadata flag adds custom tags that help you track when images were uploaded and by whom. Useful for audits.
Time estimate: 20,000 images at 15 GB per 1,000 images = 300 GB total. At 10 Mbps = 7 hours. Overnight upload makes sense here.
Scenario 3: Automated Upload from Field
You’re flying with a laptop on-site. Process starts immediately after landing. Images need to move to S3 automatically so the EC2 instance can grab them.
This requires a Python script running on your field laptop that monitors the drone’s SD card folder and uploads new images automatically.
Simple Python uploader (using boto3):
import boto3
import os
from pathlib import Path
from datetime import datetime

s3_client = boto3.client('s3', region_name='us-east-2')
BUCKET = 'aerocartwright-odm-processing'
PROJECT_ID = 'project-001-Smith-Property'

def upload_drone_images(local_drone_folder, s3_prefix):
    """Monitor a drone folder and upload new images to S3."""
    local_path = Path(local_drone_folder)

    for image_file in local_path.glob('*.JPG'):
        s3_key = f"projects/{PROJECT_ID}/images/{image_file.name}"

        print(f"Uploading {image_file.name}...")
        s3_client.upload_file(
            str(image_file),
            BUCKET,
            s3_key,
            ExtraArgs={'ContentType': 'image/jpeg'}
        )
        print(f"  {image_file.name} uploaded")

if __name__ == '__main__':
    # Monitor /Volumes/DCIM/100MEDIA (where DJI drones store images)
    upload_drone_images('/Volumes/DJI_SD_Card/DCIM/100MEDIA/', f'projects/{PROJECT_ID}/images/')
Drop this on your field laptop. Run it after each battery swap. It uploads new images only — won’t duplicate. Your WebODM instance queries S3 for new images and starts processing automatically (covered in Run phase with Lambda triggers).
Downloading Results Efficiently
Processing is done. WebODM has generated your orthomosaic, point cloud, and DSM. Time to get them off the instance.
Download From WebODM to Your Laptop
Simplest approach: download through the WebODM interface. Click the project, go to Assets, grab what you need.
For automation or bulk downloads:
# Download the entire output folder for one project
aws s3 sync s3://aerocartwright-odm-processing/projects/project-001-Smith-Property/outputs/ \
  ~/Downloads/project-001-outputs/ \
  --no-progress

# If you only want the orthomosaic (saves transfer time)
aws s3 cp s3://aerocartwright-odm-processing/projects/project-001-Smith-Property/outputs/orthophoto.tif \
  ~/Downloads/project-001-outputs/ \
  --sse AES256  # Encrypt transfer if paranoid
Egress Costs — The Surprise Line Item
AWS charges $0.09 per GB for data leaving their network (first 100 GB/month free, then $0.09/GB). This is where most operators get surprised.
Real example:
- Orthomosaic (GeoTIFF): 12 GB
- Point cloud (LAZ compressed): 8 GB
- DSM (GeoTIFF): 6 GB
- Mesh (OBJ + textures): 15 GB
- Total outputs: 41 GB
- Download cost: 41 × $0.09 = $3.69
That’s one job. Process 10 per month, download all results: $37 in transfer fees.
How to cut egress costs:
-
Only download what you need. If the client only wants the orthomosaic, skip the point cloud. Clean out outputs you won’t use.
-
Put CloudFront in front of S3. First 1 TB per month free. 15 minutes to set up, saves $0.09/GB on every download. See “Presigned URLs via CloudFront” below.
-
Let clients download directly via CloudFront. Put CloudFront in front of S3, generate a presigned URL to the CloudFront distribution. The first 1 TB/month from CloudFront is free — at typical volumes, effective egress cost drops to $0. Without CloudFront, the bucket owner still pays $0.09/GB even on presigned URL downloads.
Presigned URLs: Secure Client Delivery
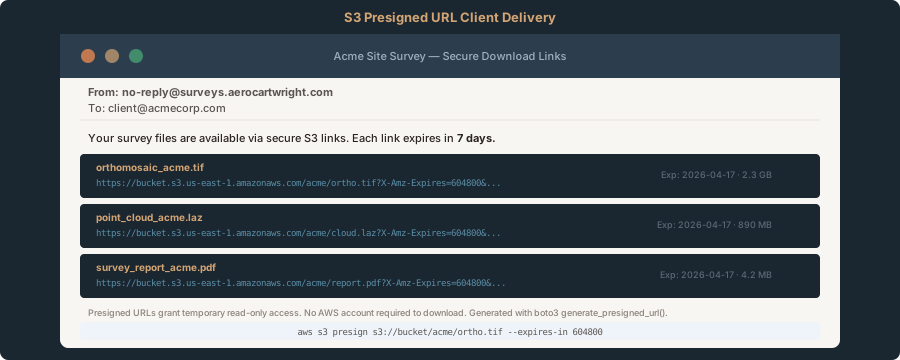
This is the move for access control. Client gets a time-limited link and downloads directly from S3 without needing an AWS account. Note: presigned URLs control who can download — they do not eliminate egress fees. The bucket owner still pays $0.09/GB for data downloaded via presigned URL. The savings come from skipping the round-trip through your laptop (you don’t download and re-upload), and from pairing presigned URLs with CloudFront, which has 1 TB/month free egress.
A presigned URL is a time-limited download link to an S3 object. You create it, email it, client clicks and downloads. After expiration (you set it — 7 days, 30 days, whatever), the link dies.
Generate a Presigned URL
Via AWS Console (easiest):
Open the Console, go to S3, find your file (orthophoto.tif). Right-click, “Share with presigned URL.” Set expiration to 7 days, copy the URL, email it to the client.
Via AWS CLI (scriptable):
# Generate a 7-day presigned URL for the orthomosaic
aws s3 presign s3://aerocartwright-odm-processing/projects/project-001-Smith-Property/outputs/orthophoto.tif \
  --expires-in 604800  # 604800 seconds = 7 days

# Output:
# https://aerocartwright-odm-processing.s3.us-east-2.amazonaws.com/projects/project-001-Smith-Property/outputs/orthophoto.tif?X-Amz-Algorithm=AWS4-HMAC-SHA256&X-Amz-Credential=...
Send that link to the client. They paste it in a browser, download starts. No AWS account needed on their end. Just a time-limited link.
Automation — create presigned URLs for all outputs:
import boto3
from datetime import timedelta

s3_client = boto3.client('s3', region_name='us-east-2')
BUCKET = 'aerocartwright-odm-processing'
PROJECT_ID = 'project-001-Smith-Property'

def generate_client_delivery_links(project_id, expiry_days=7):
    """Generate presigned URLs for all outputs in a project."""
    outputs = s3_client.list_objects_v2(
        Bucket=BUCKET,
        Prefix=f'projects/{project_id}/outputs/'
    )

    print(f"\nDownload links for {project_id}:")
    print("=" * 80)

    for obj in outputs.get('Contents', []):
        key = obj['Key']
        filename = key.split('/')[-1]

        url = s3_client.generate_presigned_url(
            'get_object',
            Params={'Bucket': BUCKET, 'Key': key},
            ExpiresIn=expiry_days * 86400
        )

        print(f"{filename}\n{url}\n")

if __name__ == '__main__':
    generate_client_delivery_links(PROJECT_ID, expiry_days=7)
Run this after processing completes. It prints download links for everything. Paste into your client email template.
Cost Comparison: Download vs. Presigned URL
| Scenario | Egress cost | Your effort |
|---|---|---|
| Download outputs to laptop, then send (41 GB × 2) | $7.38 | 15 min + internet wait ×2 |
| Client downloads via presigned URL (direct S3) | $3.69 (bucket owner pays $0.09/GB) | 2 min (generate + email) |
| Client downloads via presigned URL + CloudFront | ~$0 (1 TB/month free tier) | 2 min (generate + email) |
| 10 projects/month, you download + re-send all | $73.80 | 150 min overhead |
| 10 projects/month, presigned URLs + CloudFront | ~$0 | 20 min overhead |
Use presigned URLs backed by CloudFront. That combination eliminates the double-egress problem and gets you to near-zero delivery cost at typical operator volumes.
Managing Storage Cost: Lifecycle Policies
Leave old projects in S3 Standard and costs add up fast. A year of storage can cost more than the compute did.
Lifecycle Policy: Auto-Move Old Projects
Create a lifecycle rule that moves old projects from S3 Standard (expensive: $0.023/GB/month) to S3 Intelligent-Tiering (cheaper: $0.0125/GB/month) or S3 Glacier (very cheap: $0.004/GB/month).
Via AWS Console:
Open S3 bucket, “Management” tab, “Lifecycle rules”. Create a new rule:
- Name: Move projects to IA after 30 days
- Apply to: Prefix
projects/(all project folders) - Action 1: Transition to S3 Intelligent-Tiering after 30 days
- Action 2: Transition to S3 Glacier after 90 days
- Action 3: Delete after 365 days (optional, for archival compliance)
Via AWS CLI (Infrastructure-as-Code approach):
# Create a JSON lifecycle policy file
cat > lifecycle.json << 'EOF'
{
  "Rules": [
    {
      "Id": "Move-old-projects",
      "Status": "Enabled",
      "Prefix": "projects/",
      "Transitions": [
        {
          "Days": 30,
          "StorageClass": "INTELLIGENT_TIERING"
        },
        {
          "Days": 90,
          "StorageClass": "GLACIER"
        }
      ],
      "Expiration": {
        "Days": 365
      }
    },
    {
      "Id": "Delete-temp-files",
      "Status": "Enabled",
      "Prefix": "temp/",
      "Expiration": {
        "Days": 7
      }
    }
  ]
}
EOF

# Apply the policy
aws s3api put-bucket-lifecycle-configuration \
  --bucket aerocartwright-odm-processing \
  --lifecycle-configuration file://lifecycle.json
Cost Impact of Storage Tiers
| Storage class | Cost per GB/month | Use case |
|---|---|---|
| S3 Standard | $0.023 | Active projects, frequent access |
| S3 Intelligent-Tiering | $0.0125 | Mixed — auto-moves based on access patterns |
| S3 Glacier Instant | $0.004 | Archival, accessed occasionally |
| S3 Glacier Deep Archive | $0.00099 | Long-term archival, rare access |
Real numbers: 500 GB in S3 Standard for a year = $138. Move to Glacier after 90 days and year-one drops to $80. Year two: $30.
Retrieve From Glacier When Needed
Projects in Glacier aren’t gone — they’re just slower to retrieve.
# Restore a project from Glacier Flexible Retrieval (Standard tier: 3-5 hours)
aws s3api restore-object \
  --bucket aerocartwright-odm-processing \
  --key projects/project-001-Smith-Property/outputs/orthophoto.tif \
  --restore-request Days=1

# After 3-5 hours (Standard tier), download
aws s3 cp s3://aerocartwright-odm-processing/projects/project-001-Smith-Property/outputs/orthophoto.tif \
  ~/Downloads/
Retrieval time and cost depend on the tier used by the lifecycle rule above (GLACIER = S3 Glacier Flexible Retrieval):
- Standard retrieval: 3–5 hours, $0.01/GB
- Expedited retrieval: ~5 minutes, $0.03/GB — faster but costs 3× more
- S3 Glacier Instant Retrieval (a separate storage class): milliseconds, but higher per-GB storage cost ($0.004/GB/month vs. $0.0036 for Flexible)
A 40 GB project via Standard retrieval costs $0.40 and takes a few hours. Plan ahead — this is not for on-demand access. Fine for occasional access, not for frequent retrievals.
S3 Bucket Security: Keep Your Data Safe
Drone imagery sitting in S3 is business-critical data. Lock it down.
Block Public Access (Default)
When you created the bucket, you selected “Block all public access.” Good. Your drone data should never be publicly accessible.
Verify:
aws s3api get-public-access-block --bucket aerocartwright-odm-processing

# Should output:
# "PublicAccessBlockConfiguration": {
#     "BlockPublicAcls": true,
#     "IgnorePublicAcls": true,
#     "BlockPublicPolicy": true,
#     "RestrictPublicBuckets": true
# }
Enable Versioning (Optional but Recommended)
Versioning keeps old versions of files. If someone accidentally deletes an orthomosaic, you restore the previous version.
# Enable versioning
aws s3api put-bucket-versioning \
  --bucket aerocartwright-odm-processing \
  --versioning-configuration Status=Enabled
Cost: You pay for storage of all versions (1 GB current + 1 GB previous = 2 GB billed). Protects against accidental deletion.
Enable Encryption
S3 encrypts data in transit (HTTPS) by default. For at-rest encryption, turn on AES-256.
# Enable default encryption
aws s3api put-bucket-encryption \
  --bucket aerocartwright-odm-processing \
  --server-side-encryption-configuration '{
    "Rules": [
      {
        "ApplyServerSideEncryptionByDefault": {
          "SSEAlgorithm": "AES256"
        }
      }
    ]
  }'
Monitor Bucket Activity
Turn on logging so you can track who accessed what and when.
# Create a logging bucket first
aws s3 mb s3://aerocartwright-odm-logs --region us-east-2

# Enable logging on main bucket
aws s3api put-bucket-logging \
  --bucket aerocartwright-odm-processing \
  --bucket-logging-status '{
    "LoggingEnabled": {
      "TargetBucket": "aerocartwright-odm-logs",
      "TargetPrefix": "access-logs/"
    }
  }'
Logs accumulate fast. Add a lifecycle rule to delete logs older than 90 days.
Storage Cost Estimation: Real Numbers
Here’s a realistic operating scenario.
Assumption: Processing 10 projects per month, 1,000 images per project (average).
Average dataset size:
- Raw images (1,000 × 20 MB): 20 GB
- Outputs (orthomosaic + point cloud + DSM + mesh): 40 GB
- Total per project: 60 GB
Monthly storage calculation (assuming lifecycle policy):
| Age | Storage class | Size | Monthly cost |
|---|---|---|---|
| 0–30 days (3 active projects) | Standard | 180 GB | $4.14 |
| 30–90 days (2 projects) | Intelligent-Tiering | 120 GB | $1.50 |
| 90+ days (5 projects) | Glacier | 300 GB | $1.20 |
| Total monthly storage cost | 600 GB | $6.84 |
Egress costs:
- 10 projects × 40 GB outputs = 400 GB downloads per month
- Using presigned URLs + CloudFront (1 TB/month free): ~$0
- Using presigned URLs (direct S3, no CloudFront): 400 × $0.09 = $36 — bucket owner still pays
- If you download to laptop then re-send: $36 ×2 = $72 (double egress)
Annual storage cost: $82 (roughly what one presigned URL per project saves).
Lifecycle policies and presigned URLs keep this cheap. A year of storage for 10 jobs per month: under $100.
Common S3 Issues and Fixes
“Access Denied” when uploading:
Your AWS credentials lack S3 write permissions. Verify your IAM user has s3:PutObject and s3:PutObjectAcl permissions.
# Check your credentials
aws sts get-caller-identity

# If you don't have permissions, ask your AWS account owner to add policy:
# AmazonS3FullAccess (for development) or a scoped policy (for production)
Presigned URL expired before client downloaded:
Increase the expiration time when generating the URL. Default is 1 hour. Set it to 7 days:
aws s3 presign s3://bucket/key --expires-in 604800
S3 bill is higher than expected:
Check the usual suspects:
- Downloading the same data repeatedly. Use presigned URLs instead of downloading and re-uploading.
- Old projects still in S3 Standard. Set up lifecycle policies to move to Glacier after 30 days.
- CloudFront misconfigured. CloudFront has its own data transfer costs if you set it up wrong.
Check your S3 bills in AWS Billing > S3. Look at “Retrieve” (downloads) and “Storage” separately.
WebODM can’t access images in S3:
WebODM needs IAM credentials to read from S3. Your EC2 instance has a role — make sure it includes s3:GetObject on your bucket. Test with:
# From the EC2 instance, try to list bucket contents
aws s3 ls s3://aerocartwright-odm-processing/

# If it fails, check the IAM role attached to the instance
aws iam get-role --role-name your-webodm-instance-role
Folder Structure Checklist
Before you start uploading, use this checklist:
- S3 bucket created in same region as WebODM EC2 instance
- Bucket versioning enabled (optional but recommended)
- Bucket encryption enabled (AES-256)
- Public access blocked
- Lifecycle policy in place (move to IA after 30 days, Glacier after 90)
- Logging enabled to separate log bucket
- IAM role on EC2 instance has
s3:GetObjectands3:PutObjectpermissions -
projects/folder structure created (via uploading first project) - First project images uploaded and verified in S3 Console
Bottom Line
S3 is your storage layer. Organize into projects/{project-id}/images/ and outputs/. Upload via CLI, deliver via presigned URLs backed by CloudFront (near-zero egress — CloudFront’s permanent 1 TB/month free tier covers most operators). Lifecycle policies move old projects to cheaper tiers after 30 days. Under $100 per year for 10 jobs per month.
The workflow: upload images, WebODM processes, S3 stores outputs, generate presigned URL, email the link. Client downloads directly. Monthly S3 bill: under $10.
For next steps, see Walk 5: Sizing Your Instance — CPUs, RAM, and When to Use Spot for choosing the right EC2 instance for your image counts.