


ODM Cloud Series — Crawl / Walk / Run · Article 2 of 10
From zero to a self-hosted cloud processing pipeline
This series builds a production WebODM setup from scratch — starting with the ecosystem fundamentals, moving through AWS spot instance setup and cost control, and finishing with auto-scaling, security, and a head-to-head comparison with commercial platforms. Each article stands alone; read in order to build the full stack.
Pricing note: AWS prices in this article are for US East (Ohio), us-east-2, checked October 2, 2026. Spot prices change throughout the day. Check the current pricing pages before you launch.
You’ve decided to move processing off your laptop. WebODM’s own hardware table calls for 32 GB of RAM (or RAM plus swap) for 500 images and 64 GB for 1,500. Most laptops don’t have that. While a big job runs, your machine is tied up for hours. Buying a high-RAM workstation you’ll use twice a month is hard to justify.
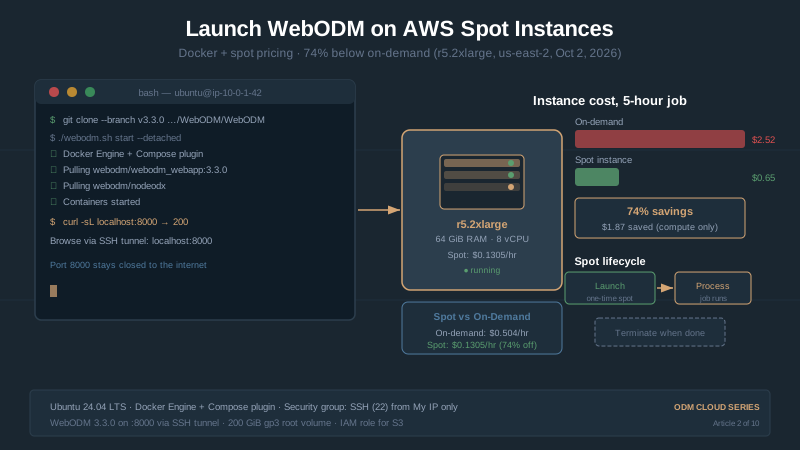
AWS spot instances split the difference. A spot instance is spare EC2 capacity sold at a discount, which AWS can take back at short notice. A 64 GB r5.2xlarge listed at $0.1305 per hour spot in us-east-2 on October 2, 2026. Run it for five hours and it costs about $0.65, plus about $0.11 for the disk and about $0.03 for its public IP address. That’s under a dollar, as long as your downloads fit in AWS’s free 100 GB per month. Past that allowance, data transfer is the biggest line on the bill. The full math is below.
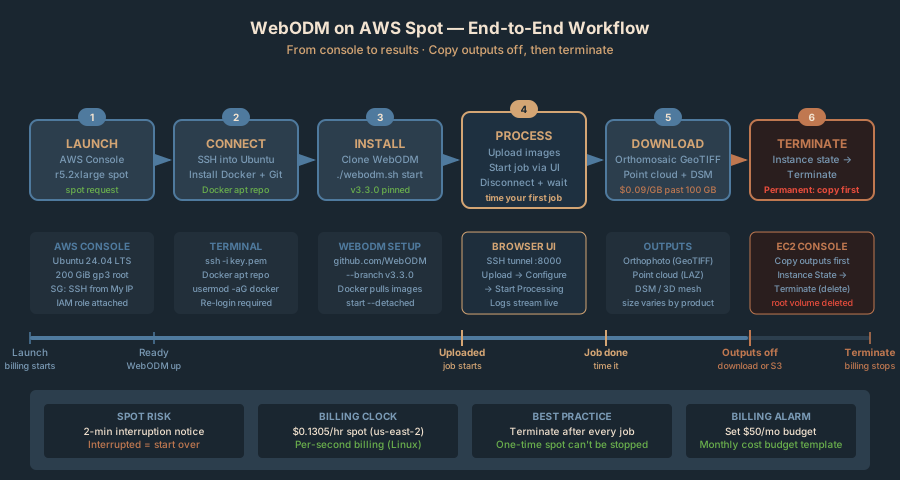
What follows is the exact sequence: launch a spot instance, install WebODM in Docker, upload images, process, download results, terminate.
What You Need Before Starting
An AWS account. Sign up at aws.amazon.com. AWS asks for a credit card and bills for what you use. The billing alarm below and the terminate step keep that bill predictable.
Basic terminal comfort. You don’t need Linux expertise. You’ll SSH in, paste a few command blocks, and check status. If you’ve opened a terminal before, you’re fine.
One drone dataset, 200–1,000 images. This is your test case. The cost example below uses 500 images.
Patience for the first launch. The first run includes creating an IAM role, a key pair and a security group. Later launches reuse all three.
The Cost Math (Real Numbers)
Before you commit to the setup work, here’s what one job costs. Prices are us-east-2, checked October 2, 2026.
Compute (EC2 spot instance): r5.2xlarge (8 vCPU, 64 GiB RAM) was $0.1305/hr spot, against $0.504/hr on-demand. That’s 74% below on-demand (0.1305 ÷ 0.504 = 0.259). Linux instances bill per second. Spot prices move, so treat $0.1305 as a snapshot.
Instance time (a planning assumption, not a benchmark): budget 5 hours of running time per 500-image job. That covers setup and upload, about 3 hours of processing, and the download. Processing time depends on image size, settings and the instance, so time your own first job and adjust.
Storage (EBS volume): a 200 GiB gp3 root volume. gp3 costs $0.08 per GB-month in us-east-2 and is billed per second. That’s 200 × $0.08 = $16.00 per month, or $16.00 ÷ 30 ÷ 24 = $0.022 per hour. Five hours: $0.11.
Public IPv4 address: AWS charges $0.005 per hour for each in-use public IPv4 address, and an instance launched in the default VPC gets one. Five hours: 5 × $0.005 = $0.025.
Data transfer (egress): AWS gives 100 GB of free data transfer out to the internet each month, aggregated across all services and regions. After that, transfer out of us-east-2 costs $0.09/GB for the first 10 TB. This example assumes 30 GB of downloaded outputs (an assumption: your size depends on which products you download). That’s 30 × $0.09 = $2.70 once you’re past the free 100 GB.
Total for one 500-image job:
- Inside the free 100 GB: $0.6525 + $0.111 + $0.025 + $0.00 = $0.79
- Past the free 100 GB: $0.6525 + $0.111 + $0.025 + $2.70 = $3.49
At 30 GB each, three jobs (90 GB) fit inside the free allowance. Ten jobs a month cost 10 × ($0.6525 + $0.111 + $0.025) = $7.89 for compute, disk and IP address, plus (300 − 100) × $0.09 = $18.00 for transfer, or $25.89 in total. The free 100 GB is shared with everything else on your account.
WebODM Cloud Instance Selection: r5.2xlarge Is the Sweet Spot
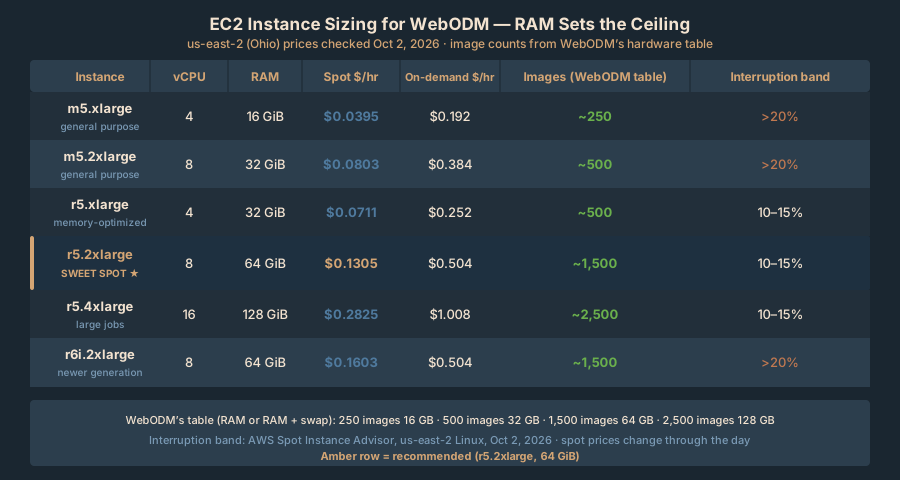
AWS EC2 offers dozens of instance types. For photogrammetry, you care about memory-optimized instances in the r5 and r6i families. They prioritize RAM over CPU, and WebODM’s limit is RAM.
The table pairs each instance’s memory with the image count WebODM’s hardware table lists for that much RAM. Prices are spot and on-demand rates for us-east-2 on October 2, 2026. The interruption column is the Spot Instance Advisor band for that day.
| Instance | vCPU | RAM | Spot $/hr | On-demand $/hr | WebODM table: images for this RAM | Interruption band |
|---|---|---|---|---|---|---|
| m5.xlarge | 4 | 16 GiB | $0.0395 | $0.192 | ~250 | >20% |
| m5.2xlarge | 8 | 32 GiB | $0.0803 | $0.384 | ~500 | >20% |
| r5.xlarge | 4 | 32 GiB | $0.0711 | $0.252 | ~500 | 10–15% |
| r5.2xlarge | 8 | 64 GiB | $0.1305 | $0.504 | ~1,500 | 10–15% |
| r5.4xlarge | 16 | 128 GiB | $0.2825 | $1.008 | ~2,500 | 10–15% |
| r6i.2xlarge | 8 | 64 GiB | $0.1603 | $0.504 | ~1,500 | >20% |
r5.2xlarge is your workhorse. 64 GiB is twice what WebODM’s table lists for 500 images, so a 500-image job has headroom. The same instance covers datasets up to about 1,500 images. For up to about 2,500 images, step up to r5.4xlarge (128 GiB), which matches the table’s 128 GB line. The table lists 192 GB for 3,500 images, which is more than an r5.4xlarge has, so jobs that size need an r5.8xlarge (256 GiB, $2.016/hr on-demand in us-east-2) or larger.
Spot prices fluctuate. Check the current price before launch in the EC2 console under Spot Requests → Pricing history, or on the Spot pricing page.
Step 0: Create an IAM Role for the Instance
Part 4 of this series, S3 storage for WebODM, has the instance read and write an S3 bucket. Don’t put access keys on the server. Give the instance an IAM role instead. Software on the instance then gets temporary credentials automatically, and there are no long-lived keys to leak.
In the IAM console, choose Roles → Create role. Set Trusted entity type to AWS service and the use case to EC2. Name the role webodm-instance-role. Give it this permissions policy and nothing else:
{
  "Version": "2012-10-17",
  "Statement": [
    {
      "Sid": "ListProjectBucket",
      "Effect": "Allow",
      "Action": "s3:ListBucket",
      "Resource": "arn:aws:s3:::aerocartwright-odm-processing"
    },
    {
      "Sid": "ReadWriteProjectObjects",
      "Effect": "Allow",
      "Action": ["s3:GetObject", "s3:PutObject", "s3:AbortMultipartUpload"],
      "Resource": [
        "arn:aws:s3:::aerocartwright-odm-processing/projects/*",
        "arn:aws:s3:::aerocartwright-odm-processing/temp/*"
      ]
    }
  ]
}
Replace aerocartwright-odm-processing with your own bucket name. Bucket names are globally unique, so you can’t reuse this one. The policy follows AWS’s read/write bucket example, cut down to least privilege. ListBucket applies to the bucket ARN. Object reads and writes apply only under projects/ and temp/, the two prefixes part 4 has the instance work in. s3:AbortMultipartUpload lets the AWS CLI clean up a large upload that fails partway. The role can’t delete objects, create buckets, change bucket settings, read IAM, or touch any other bucket. Run part 4’s bucket-setup commands from your own computer, not from the instance. The bucket doesn’t have to exist yet; you create it in part 4.
When you create the role in the console, AWS creates an instance profile with the same name. That’s what you select at launch.
Step 1: Launch the Spot Instance
Log into the AWS console at console.aws.amazon.com. In the region selector at the top right, choose US East (Ohio).
Navigate to EC2 and choose Launch instance. Every setting below is in the launch instance wizard.
Name. Something like webodm-spot.
Application and OS Images. Choose Ubuntu, then Ubuntu Server 24.04 LTS, 64-bit (x86). Canonical lists standard support for 24.04 until May 2029. Ubuntu 26.04 LTS has been out since April 2026 and Docker supports both, but every command below follows the 24.04 documentation.
Instance type: r5.2xlarge. Search for it in the dropdown. It shows 8 vCPU and 64 GiB memory.
Key pair (login). Choose Create new key pair, give it a name, and choose the .pem file format, which works with OpenSSH on Mac, Linux and Windows. The private key downloads once. Store it somewhere safe and never commit it to a repository or share it.
Network settings. Keep the default VPC. Under Firewall (security groups), create a new security group. The wizard adds an inbound SSH rule open to all IP addresses by default. AWS’s own documentation calls that unsafe beyond a brief test. Change it:
- SSH (TCP 22), source type My IP. That’s the only inbound rule you need.
Don’t open port 8000. You’ll reach WebODM through an SSH tunnel in Step 4. WebODM serves plain HTTP on port 8000, and on a fresh install, whoever opens the page first creates the administrator account. An open port 8000 hands both of those to anyone who finds it. You don’t need port 3000 either: WebODM’s Docker Compose file only exposes the NodeODX node inside Docker’s network and doesn’t publish it on the host.
If your home IP address changes, edit the SSH rule back to My IP.
Configure storage. Set the root volume to 200 GiB, type gp3. Docker images, uploaded photos and WebODM’s outputs all live on the root disk, so size it there rather than adding a second volume that you’d have to format and mount. A root volume attached at launch defaults to delete on termination. To confirm, open the Advanced storage view and check that Delete on termination reads Yes. That’s what stops a forgotten disk from billing $16 a month.
Advanced details. Expand it and set:
- IAM instance profile:
webodm-instance-role(from Step 0). - Purchasing option: Spot Instances. Without a maximum price, the wizard requests spot capacity at the spot price, capped at the on-demand price. AWS marks setting your own maximum price as “not recommended”, so leave it blank. Under Customize Spot Instance options, keep the request type One-time and the interruption behavior Terminate, the default.
Launch. Choose Launch instance in the Summary panel. Wait for the instance to show Running in the EC2 console with its status checks passed.
Step 2: Connect to the Instance via SSH
Grab the instance’s Public IPv4 address from the EC2 console. The examples below use 203.0.113.10, an address reserved for documentation. Substitute your own.
On Mac or Linux:
chmod 400 /path/to/your-key-pair.pem
ssh -i /path/to/your-key-pair.pem [email protected]
On Windows: the same ssh command works in PowerShell with Windows’s built-in OpenSSH client (Windows 10 build 1809 or later). If ssh isn’t recognized, add OpenSSH Client under Optional Features. Skip the chmod line on Windows.
The first time you connect, SSH asks whether you trust this host. Type yes and press Enter. You’re now logged into your cloud server.
Step 3: Install Docker and Git
Your Ubuntu instance is bare. Install Docker Engine from Docker’s own apt repository, the method Docker documents for Ubuntu 24.04. Don’t install Ubuntu’s docker.io or docker-compose packages. Docker lists both as conflicting with its own packages.
sudo apt update
sudo apt install -y ca-certificates curl git
sudo install -m 0755 -d /etc/apt/keyrings
sudo curl -fsSL https://download.docker.com/linux/ubuntu/gpg -o /etc/apt/keyrings/docker.asc
sudo chmod a+r /etc/apt/keyrings/docker.asc

sudo tee /etc/apt/sources.list.d/docker.sources <<EOF
Types: deb
URIs: https://download.docker.com/linux/ubuntu
Suites: $(. /etc/os-release && echo "${UBUNTU_CODENAME:-$VERSION_CODENAME}")
Components: stable
Architectures: $(dpkg --print-architecture)
Signed-By: /etc/apt/keyrings/docker.asc
EOF

sudo apt update
sudo apt install -y docker-ce docker-ce-cli containerd.io docker-buildx-plugin docker-compose-plugin
sudo usermod -aG docker $USER
The last line lets the ubuntu user run Docker without sudo. Docker warns that membership in the docker group is root-equivalent, which is fine on a single-user server you own. Log out and back in so the group change takes effect:
exit
ssh -i /path/to/your-key-pair.pem [email protected]
Verify Docker and the Compose plugin:
docker --version
docker compose version
Both print a version number. WebODM’s start script looks for docker-compose first and falls back to the docker compose plugin you just installed.
Optional, for part 4: install the AWS CLI with AWS’s Linux installer. It picks up the instance role’s credentials automatically, so don’t run aws configure on the instance.
sudo apt install -y unzip
curl "https://awscli.amazonaws.com/awscli-exe-linux-x86_64.zip" -o "awscliv2.zip"
unzip awscliv2.zip
sudo ./aws/install
aws --version
Step 4: Clone WebODM 3.3.0 and Start It
WebODM is now maintained independently from OpenDroneMap (split April 2026), at github.com/WebODM/WebODM. This guide pins WebODM 3.3.0, the current release as of October 2, 2026, so the steps below keep working when a new release ships.
git clone --branch v3.3.0 --depth 1 https://github.com/WebODM/WebODM --config core.autocrlf=input
cd WebODM
sed -i 's#image: webodm/webodm_webapp$#image: webodm/webodm_webapp:3.3.0#' docker-compose.yml
./webodm.sh start --detached
The git clone line pins the scripts and Compose files to the v3.3.0 tag. The sed line pins the WebODM container too. Without it, docker-compose.yml pulls the untagged image, which means Docker Hub’s latest, and that can be newer than 3.3.0. Two images stay unpinned. The NodeODX processing node (webodm/nodeodx) has only latest, master and gpu tags on Docker Hub, with no version tags. The database image (webodm/webodm_db) is also untagged in the Compose file, and latest is its only tag. Both follow whatever is current when you pull. --detached runs WebODM in the background, so it keeps running after you close SSH. The first start downloads several container images, so give it a few minutes.
Check that it’s up. The curl line is the same check WebODM’s own start script uses:
docker ps --format '{{.Names}}'
curl -sL -o /dev/null -w "%{http_code}\n" http://localhost:8000
You should see webapp, worker, db, broker and node-odx-1, then 200.
Open the tunnel. On your own computer, open a new terminal and forward local port 8000 to the instance over SSH (-L):
ssh -i /path/to/your-key-pair.pem -N -L 8000:localhost:8000 [email protected]
Leave that window open and browse to http://localhost:8000 on your own machine. The traffic travels inside the encrypted SSH connection, and port 8000 stays closed to the internet.
Create the admin account now. On a fresh install, WebODM sends the first visitor to a Welcome page to create the administrator account. Do it immediately, with a strong password.
If you later need WebODM reachable without a tunnel, use ./webodm.sh restart --ssl --hostname your.domain.example. That requests a Let’s Encrypt certificate and needs a real DNS name (not an IP address) plus inbound ports 80 and 443. Even then, limit those rules to the addresses that need access.
Step 5: Upload and Process Your First Dataset
The interface at http://localhost:8000 is the same WebODM interface you may have used locally. Nothing new to learn.
Create a project. Name it “Test AWS Run” or similar.
Upload images. Select your 200 to 500 images. Upload time is image size × count ÷ your upload speed. As an example, at an assumed 10 MB per image, 500 images are 5 GB, or 40,000 megabits. At 50 Mbps upload that takes 800 seconds, about 13 minutes. At 10 Mbps it takes 4,000 seconds, about 67 minutes. Keep the SSH tunnel open until the upload finishes.
Configure processing. Start with the default options unless you have a reason to change them.
Monitor progress. The task console streams the processing log as it runs.
Once the upload is done and the task is running, you can close the browser and the tunnel. WebODM was started detached, so processing keeps going. Reopen the tunnel to check status later.
Step 6: Download Results
When the task completes, open its Download menu. WebODM 3.3.0 offers, among others:
Orthophoto (orthophoto.tif). Your georeferenced aerial image, the primary deliverable for most surveys.
Point Cloud (georeferenced_model.laz, also exportable as LAS, PLY or CSV), if you need 3D data.
Surface Model and Terrain Model (dsm.tif, dtm.tif), when you enabled DSM/DTM generation.
Textured Model (textured_model.zip, or glTF). For visual 3D models.
All Assets (all.zip). Everything, and usually the largest download.
Download only what the client needs. Every gigabyte past the free 100 GB costs $0.09, and the instance keeps billing while the download runs. Transfer time is file size × 8,000 ÷ speed in Mbps (1 GB = 8,000 megabits). For 30 GB:
- At 100 Mbps: 30 × 8,000 ÷ 100 = 2,400 seconds, 40 minutes.
- At 5 Mbps: 30 × 8,000 ÷ 5 = 48,000 seconds, 13.3 hours. That’s 13.3 × ($0.1305 + $0.022 + $0.005) = about $2.10 more in instance, disk and IP-address time.
On a slow connection, copy the outputs to S3 from the instance and terminate it before you download. Part 4 of this series, S3 storage for WebODM, covers that, using the IAM role from Step 0.
Step 7: Terminate the Instance (Critical)
This is the step people forget.
An r5.2xlarge left running at $0.1305/hr spot costs 168 × $0.1305 = $21.92 a week, or 720 × $0.1305 = $93.96 for a 30-day month. Its public IPv4 address adds 168 × $0.005 = $0.84 a week, or 720 × $0.005 = $3.60 a month. On-demand, the same week costs 168 × $0.504 = $84.67.
Warning: terminating is permanent. AWS’s documentation is blunt: a terminated instance can’t be recovered, and every volume set to delete on termination is permanently deleted with it. Before you terminate, confirm you’ve downloaded or copied to S3 every output you need. Your WebODM projects, uploaded images and results are on that disk and go with it.
To terminate:
- In the EC2 console, choose Instances and select your instance.
- Choose Instance state → Terminate (delete) instance.
- Confirm with Terminate (delete).
Then open Elastic Block Store → Volumes and confirm no available (unattached) 200 GiB volume is left behind. An orphaned 200 GB gp3 volume bills $16/month, about $0.53/day.
Why not stop it instead? A spot instance from a one-time request can’t be stopped. AWS only allows stopping spot instances launched from a persistent request. Even on-demand, a stopped instance still pays for its disk. Terminate after each job and relaunch with the same key pair, security group and IAM role next time.
Setting Up a Billing Alarm (Avoid Surprises)
Set one up before your first launch. In the Billing and Cost Management console, open Budgets → Create budget and pick the Monthly cost budget template. AWS describes it as a monthly budget that notifies you if you exceed, or are forecast to exceed, the amount you set. Pick an amount that would surprise you, such as $50, and add your email.
By the numbers above, a 500-image job costs about $0.79 when your downloads stay inside the free 100 GB, and $3.49 once they don’t. A month that runs well past your job count times those figures means something is still running, or a volume was left behind. Reading Your First AWS Bill walks through finding it.
Your First Job Cost Breakdown
Here’s the cost model for a 500-image job on r5.2xlarge, at us-east-2 prices checked October 2, 2026. Hours and output size are planning assumptions, not measurements.
| Item | Arithmetic | Cost |
|---|---|---|
| EC2 spot instance | 5 hours × $0.1305/hr | $0.65 |
| EBS gp3 root volume | 200 GB × $0.08 ÷ 30 days ÷ 24 h × 5 h | $0.11 |
| Public IPv4 address | 5 h × $0.005/hr | $0.03 |
| Data transfer out, inside free 100 GB/month | 30 GB × $0.00 | $0.00 |
| Total, inside free allowance | $0.6525 + $0.111 + $0.025 | $0.79 |
| Data transfer out, past free allowance | 30 GB × $0.09/GB | $2.70 |
| Total, past free allowance | $0.7885 + $2.70 | $3.49 |
Ten jobs a month: $7.89 for compute, disk and IP address, plus $18.00 of transfer for the 200 GB past the free allowance, $25.89 in total. Failed runs and spot price swings add to that.
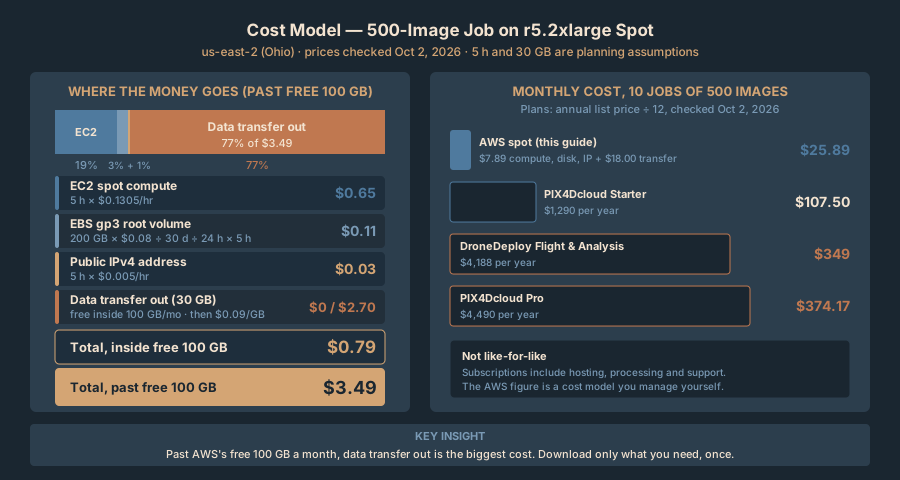
For comparison, these are subscription list prices checked October 2, 2026. They are annual plans that include hosting, processing and support, so they aren’t a like-for-like match for a per-job AWS cost:
- DroneDeploy Flight & Analysis (Individual): $4,188 per year, billed annually ($349/month equivalent)
- PIX4Dcloud: Starter $1,290 per year, Pro $4,490 per year
- Local workstation: the hardware cost up front, plus electricity and your time maintaining it
AWS wins for burst capacity and occasional large jobs, as long as you’re comfortable managing the instance yourself.
Bottom Line
Spot instances make cloud processing practical for solo operators and small teams. An r5.2xlarge processes a 500-image job for about $0.79 in compute, disk and IP address. Downloads past AWS’s free 100 GB a month add $0.09/GB, which puts a 30 GB job at $3.49. You own the infrastructure and control the pipeline, with no subscription.
Lock it down from the start: SSH from your IP only, WebODM through the tunnel, an IAM role instead of access keys, and a budget alert.
Run a test on a small dataset first. Process it, download it, terminate the instance, and check the bill the next day. Then start moving production work to the cloud.