


You downloaded 400 drone images from a bridge inspection. The client needs an orthomosaic by Friday. Pix4D’s subscription lapsed, Metashape’s license is on your other machine, and you need to process right now.
WebODM runs on your hardware, costs nothing, and produces survey-grade orthomosaics, point clouds, DSMs, and 3D models from the same photogrammetric engine that powers commercial ODM deployments worldwide. The catch: you need Docker, and Docker on Windows has opinions about how much RAM you’re allowed to use.
This guide walks through the full installation — Docker Desktop setup, WebODM clone and launch, your first processing task, and every error message I’ve hit along the way — on Windows, Mac, and Linux. Every command is copy-paste ready.

What WebODM Actually Is
WebODM is the browser-based interface for OpenDroneMap — the open-source photogrammetry engine. You upload drone images, configure processing parameters, and get back orthomosaics, digital surface models, point clouds, and textured 3D meshes. Same deliverables as Pix4D or Metashape. No license key. No subscription.
Under the hood, WebODM is a Django web application that dispatches processing jobs to NodeODX — formerly NodeODM, a separate service running the actual ODM engine. Both run inside Docker containers. When you start WebODM locally, Docker spins up the web interface, the processing node, and a PostgreSQL database. Three containers, one command.
The current stable release via Docker is WebODM 3.1.3. It uses Docker Compose to orchestrate everything, with separate compose files for GPU acceleration, SSL, and development configurations.
Before You Install: Hardware Reality Check
WebODM will install on almost anything. Processing drone imagery is a different story. The ODM engine is memory-hungry — more so than Pix4D or Metashape for equivalent datasets.
| Dataset Size | RAM Required | Recommended Swap | Estimated Processing Time |
|---|---|---|---|
| 40 images | 4 GB | 4 GB | 10–20 minutes |
| 250 images | 16 GB | 16 GB | 1–3 hours |
| 500 images | 32 GB | 32 GB | 3–6 hours |
| 1,500 images | 64 GB | 64 GB | 8–16 hours |
| 2,500 images | 128 GB | 128 GB | 16–36 hours |
| 5,000 images | 256 GB | 256 GB | 24–72 hours |
Minimum specs for a real installation:
- RAM: 16 GB minimum. 32 GB if you’re processing anything beyond test datasets.
- CPU: 4+ cores. More cores speed up processing but increase memory usage. An 8-core machine is the practical sweet spot.
- Disk: 100 GB free minimum. Processing generates intermediate files — budget 6x your input image size in temporary disk space. A 10 GB image set needs 60 GB of scratch space.
- GPU: Optional but significant. CUDA-compatible NVIDIA GPUs accelerate feature extraction on Linux and WSL. Requires nvidia-docker and the
--gpuflag.
To put it plainly: if your machine can’t run Metashape comfortably, it won’t run WebODM comfortably either. The laws of photogrammetry don’t change because the software is free.
Step 1: Install Docker Desktop
WebODM runs inside Docker containers. No Docker, no WebODM. Here’s what each platform needs.
Windows
Requirements:
- Windows 10 version 22H2 (build 19045) or Windows 11 version 23H2 (build 22631) or later
- 64-bit processor with Second Level Address Translation (SLAT)
- 8 GB system RAM minimum (16 GB recommended for WebODM)
- Hardware virtualization enabled in BIOS (VT-x on Intel, AMD-V on AMD)
- WSL 2 version 2.1.5 or later
Install WSL 2 first:
wsl --install
Restart your machine. WSL 2 installs Ubuntu by default — that’s fine. You need the Linux kernel, not a specific distro.
Install Docker Desktop:
Download from docker.com/products/docker-desktop. Run the installer. Select “Use WSL 2 instead of Hyper-V” when prompted. Restart again.
After restart, open Docker Desktop and verify it’s running. You’ll see the whale icon in your system tray.
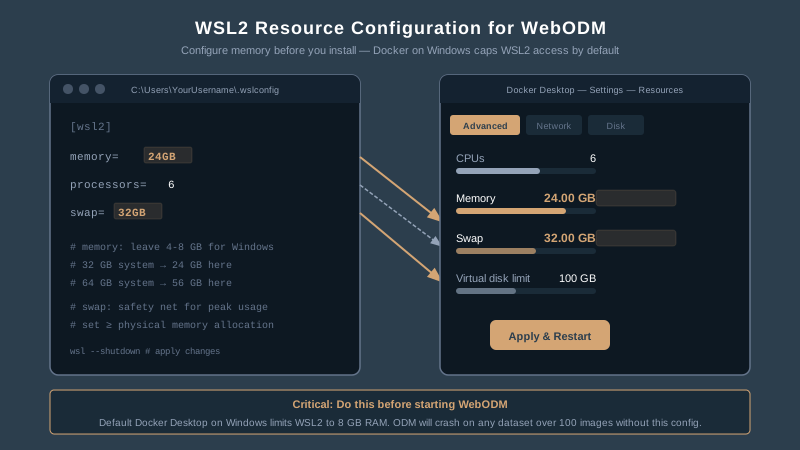
Critical step most guides skip — configure resources:
Docker Desktop on Windows limits how much RAM WSL 2 can access. The default is typically 50% of your system memory or 8 GB, whichever is less. For WebODM, that’s not enough.
Create or edit C:\Users\YourUsername\.wslconfig:
[wsl2]
memory=24GB
processors=6
swap=32GB
Adjust memory to leave 4–8 GB for Windows itself. If you have 32 GB total, allocate 24 GB. If you have 64 GB, allocate 56 GB. Set swap to at least your physical memory allocation — this is your safety net when ODM hits peak memory during dense matching.
Restart WSL for changes to take effect:
wsl --shutdown
Then reopen Docker Desktop.
macOS
Requirements:
- macOS 12 (Monterey) or later
- Apple Silicon (M1/M2/M3/M4) or Intel with VT-x
- 8 GB RAM minimum (16 GB recommended)
Download Docker Desktop from docker.com/products/docker-desktop. Open the .dmg, drag to Applications, launch.
Configure resources:
Docker Desktop > Settings > Resources > Advanced. Set memory to at least 8 GB — 16 GB if your machine has 32 GB or more. CPU cores: at least 4. Disk image size: at least 100 GB.
Click “Apply & Restart.”
Linux
Docker runs natively on Linux — no virtualization layer, no WSL, no resource limits to configure. This is why WebODM runs best on Linux.
Ubuntu/Debian:
sudo apt-get update
sudo apt-get install -y docker.io docker-compose-v2 git
sudo usermod -aG docker $USER
Log out and back in for the group change to take effect.
Verify Docker is running:
docker --version
docker compose version
You should see Docker 24+ and Compose v2+. If docker compose doesn’t work but docker-compose does, you have the legacy Compose — it’ll work, but consider upgrading.
For GPU acceleration on Linux:
# Install NVIDIA Container Toolkit
distribution=$(. /etc/os-release;echo $ID$VERSION_ID)
curl -fsSL https://nvidia.github.io/libnvidia-container/gpgkey | sudo gpg --dearmor -o /usr/share/keyrings/nvidia-container-toolkit-keyring.gpg
curl -s -L https://nvidia.github.io/libnvidia-container/$distribution/libnvidia-container.list | \
  sed 's#deb https://#deb [signed-by=/usr/share/keyrings/nvidia-container-toolkit-keyring.gpg] https://#g' | \
  sudo tee /etc/apt/sources.list.d/nvidia-container-toolkit.list
sudo apt-get update
sudo apt-get install -y nvidia-container-toolkit
sudo systemctl restart docker
Step 2: Clone and Start WebODM
Same process on all three platforms. Open a terminal — PowerShell on Windows, Terminal on Mac, your shell on Linux.
git clone https://github.com/WebODM/WebODM --config core.autocrlf=input --depth 1
cd WebODM
./webodm.sh start
On Windows PowerShell, use:
git clone https://github.com/WebODM/WebODM --config core.autocrlf=input --depth 1
cd WebODM
bash webodm.sh start
The first run pulls Docker images — webodm/webodm_webapp, webodm/nodeodx, and postgis/postgis. Expect 2–5 GB of downloads depending on your connection. Subsequent starts take 10–30 seconds.
When you see output like:
WebODM is running at http://localhost:8000
You’re live.
With GPU acceleration (Linux/WSL only):
./webodm.sh start --gpu
This launches NodeODX with NVIDIA runtime access. Requires nvidia-docker installed (see above).
Step 3: First Login and Orientation
Open your browser and navigate to http://localhost:8000.
You’ll see the WebODM login page. On first launch, it prompts you to create an admin account — pick a username and password. This is local-only, stored in the PostgreSQL container. No data leaves your machine.
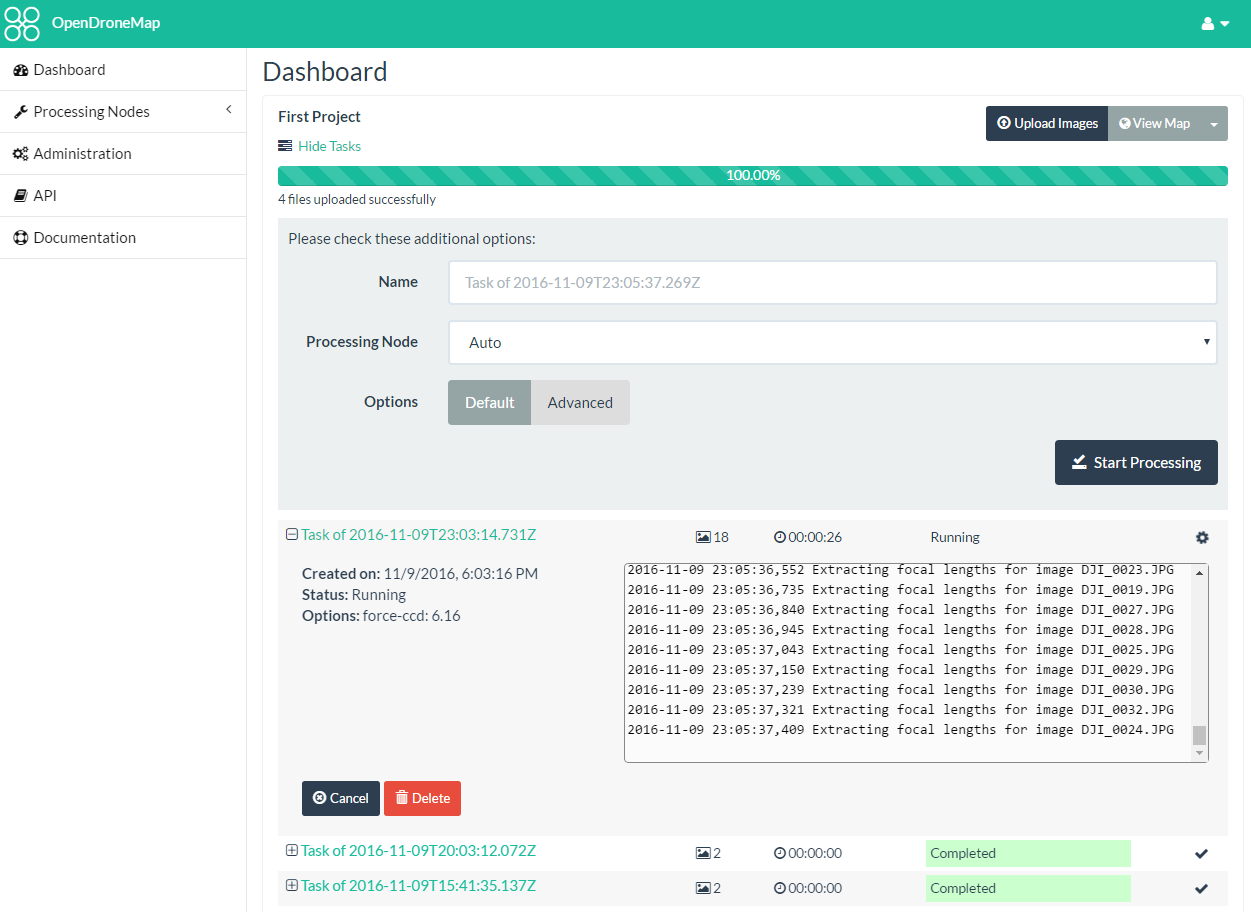
After login, you land on the Dashboard. Key areas:
- Projects — top-level organizational containers. One per job site or client.
- Tasks — individual processing runs within a project. Each task is one dataset uploaded and processed.
- Processing Nodes — the list of NodeODX instances available. By default, you have one:
node-odx-1running on the same machine atlocalhost:3000.
Step 4: Upload Images and Run Your First Task
- Click “Add Project” — name it something meaningful. “Bridge Inspection - Test” works.
- Inside the project, click “Select Images and GCP” — drag in your drone images. JPEG or TIFF. WebODM also accepts a GCP file if you have one (
gcp_list.txtin ODM format). - Click “Review” to see processing options.
Processing options that matter:
- dsm: Generate a Digital Surface Model. Default is on.
- dtm: Generate a Digital Terrain Model. Turn this on if you need bare-earth elevation.
- orthophoto-resolution: Output resolution in cm/pixel. Default is 5. Lower numbers mean higher resolution and significantly more processing time and memory.
- feature-quality: ultra, high, medium, low. Start with “medium” on your first run. “Ultra” will consume all your RAM on large datasets.
- pc-quality: Point cloud quality. Same scale. “Medium” is safe for testing.
- min-num-features: Minimum features per image. Default 10000 is fine for most datasets.
- Click “Start Processing”.
The task enters the queue on your local NodeODX instance. You can monitor progress in the task panel — it shows the current stage (dataset, opensfm, openmvs, odm_filterpoints, etc.) and a progress bar.
Processing a 100-image dataset on a 32 GB machine with 8 cores takes roughly 30–60 minutes at medium quality. A 500-image dataset at the same settings: 3–6 hours. Plan accordingly.
Step 5: Understanding the Task Queue
WebODM processes one task at a time per NodeODX instance. If you submit three tasks, they queue — first in, first out. The second task won’t start until the first finishes or fails.
This is where WebODM’s architecture matters. Each NodeODX instance is an independent processing worker. Want parallel processing? Add more nodes. On the same machine:
./webodm.sh start --default-nodes 0
Then add nodes manually through the WebODM UI, or run additional NodeODX containers on separate ports. For serious production use, most operators run NodeODX on dedicated processing machines and point WebODM at them over the network.
WebODM also supports ClusterODX — formerly ClusterODM, a load balancer that distributes tasks across multiple NodeODX instances. That’s beyond a local install guide, but worth knowing it exists when your queue grows.
Step 6: Accessing Your Results
Once processing completes, click on the task. You get:
- 2D Map — the orthomosaic displayed on a web map. Pan, zoom, measure. Export as GeoTIFF.
- 3D View — textured mesh or point cloud in the browser. WebODM uses Potree for point cloud visualization.
- Downloads — orthophoto (GeoTIFF), DSM (GeoTIFF), DTM (GeoTIFF), point cloud (LAZ), textured model (OBJ), camera positions, and the full processing report.
All output files sit in the WebODM/app/media/ directory inside your cloned repository, organized by task ID. You can access them directly from the filesystem — no need to use the web interface for every export.
The GeoTIFFs are georeferenced and ready to load into QGIS, ArcGIS, or any GIS platform. The LAZ point cloud opens in CloudCompare, Potree, or any LAS-compatible viewer.
Native Installer vs. Docker: The Trade-off
WebODM offers a paid native installer for Windows and macOS (available at opendronemap.org/webodm/download). Here’s the honest comparison:
| Docker (Free) | Native Installer (Paid) | |
|---|---|---|
| Cost | Free | One-time purchase |
| Version | Latest (3.1.3) | May lag behind (currently ships 2.8.1) |
| Resource access | Limited by WSL/.wslconfig on Windows | Full hardware access — no WSL memory cap |
| Setup complexity | Git + Docker + config files | Download and run |
| GPU support | Linux/WSL with nvidia-docker | Native GPU access on supported platforms |
| Updates | ./webodm.sh update — always current | Manual update downloads |
| Troubleshooting | Docker logs, container management | Simpler — fewer moving parts |
The native installer is worth it if you’re on Windows and don’t want to deal with WSL memory configuration. Docker is the right choice if you want the latest version, you’re on Linux, or you need fine-grained control over the deployment.
For Linux users, there’s no reason to buy the installer. Docker runs natively with full hardware access. The installer exists to solve Windows and Mac friction — friction that doesn’t exist on Linux.
WebODM Lightning: The Cloud Alternative
If your machine can’t handle the processing — or you don’t want to wait 6 hours for a 500-image dataset — WebODM Lightning is the hosted alternative at webodm.net.
Lightning uses a different photogrammetry engine (LGT) that’s optimized for cloud processing. It supports arbitrary coordinate systems, higher-quality 3D models, and permanent result storage on their servers. You still run the WebODM interface locally (or in a browser), but processing happens on their hardware.
The trade-off: you’re uploading potentially gigabytes of imagery over the internet, and you’re paying per-processing-minute. For operators with limited hardware or occasional processing needs, Lightning makes sense. For daily processing or sensitive data that can’t leave your network, local is the answer.
You can run both — local NodeODX for small jobs and quick turnaround, Lightning for large datasets that would choke your workstation. WebODM lets you switch processing nodes per task.
Common Errors and How to Fix Them
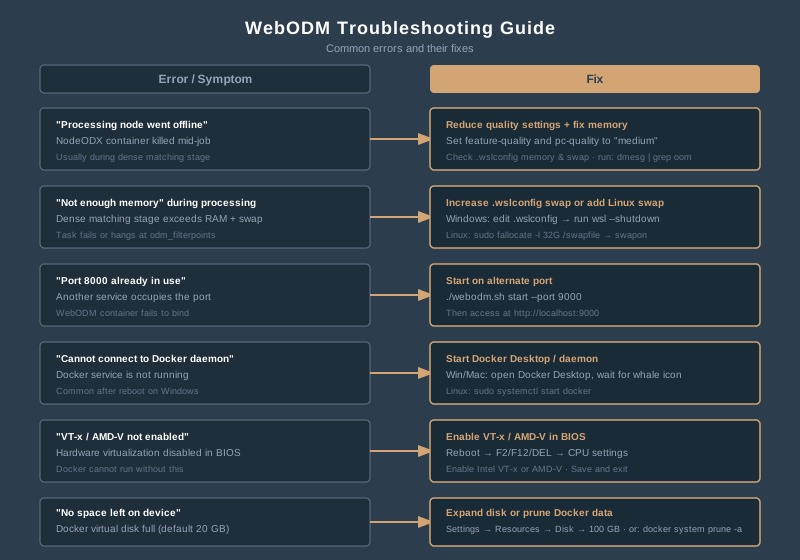
I’ve hit every one of these. Here are the actual error messages and actual fixes.
”Processing node went offline”
What happened: NodeODX ran out of memory and Docker killed the container.
Fix: Reduce feature-quality and pc-quality to “medium” or “low.” If you’re on Windows, check your .wslconfig — the memory limit is probably too low. Increase swap allocation. On Linux, check dmesg | grep -i oom for out-of-memory killer logs.
”Not enough memory” during processing
What happened: ODM’s dense matching stage exceeded available RAM + swap.
Fix on Windows: Edit .wslconfig to allocate more memory and swap, then run wsl --shutdown and restart Docker Desktop. Set swap to at least 2x your physical memory allocation.
Fix on Linux: Add swap space:
sudo fallocate -l 32G /swapfile
sudo chmod 600 /swapfile
sudo mkswap /swapfile
sudo swapon /swapfile
Add to /etc/fstab to persist across reboots.
Port 8000 already in use
What happened: Another service is using port 8000.
Fix: Either stop the conflicting service or start WebODM on a different port:
./webodm.sh start --port 9000
Then access at http://localhost:9000.
”Cannot connect to the Docker daemon”
What happened: Docker isn’t running.
Fix on Windows/Mac: Open Docker Desktop and wait for it to finish starting. Check the system tray icon.
Fix on Linux:
sudo systemctl start docker
sudo systemctl enable docker
“VT-x/AMD-V not enabled” or “Hardware virtualization not available”
What happened: Your BIOS has virtualization disabled.
Fix: Restart, enter BIOS (usually F2, F12, or DEL during boot), find Intel VT-x or AMD-V under CPU settings, enable it. Save and exit. This is a hard requirement — Docker cannot run without hardware virtualization on Windows.
”No space left on device”
What happened: Docker’s virtual disk is full. On Windows, Docker defaults to a 20 GB virtual disk.
Fix: Docker Desktop > Settings > Resources > Advanced > Disk image size. Increase to at least 100 GB. Apply and restart.
Alternatively, prune unused Docker data:
docker system prune -a
This removes all stopped containers, unused images, and build cache. You’ll re-download WebODM images on next start — budget 2–5 GB.
Managing Your WebODM Installation
Commands you’ll use regularly:
# Start WebODM
./webodm.sh start

# Stop WebODM
./webodm.sh stop

# Update to latest version
./webodm.sh update

# Restart with GPU support
./webodm.sh restart --gpu

# Start without default processing node (add your own)
./webodm.sh restart --default-nodes 0

# Enable SSL for network access
./webodm.sh restart --ssl --hostname webodm.mycompany.com

# Check running containers
docker ps
Your project data persists across restarts in Docker volumes — webodm_appmedia and webodm_dbdata. If you need to nuke the installation and start fresh, remove all volumes except those two to keep your processed results.
WebODM is professional-grade photogrammetry software that runs on your hardware for free. The installation is a Docker pull and a shell script. The gotchas are all resource-related — memory limits on Windows, disk space, swap allocation.
If you’re on Linux with 32+ GB of RAM, you’ll be processing within 15 minutes of starting this guide. On Windows, budget an extra 30 minutes for WSL and Docker configuration. On Mac, it’s somewhere in between.
The software is the easy part. The hard part is the same as every other photogrammetry platform: good input data, proper GCPs, and enough patience to let the machine grind through dense matching without killing the process because it looks frozen. It’s not frozen. It’s doing math.
For more on choosing the right processing software for your workflow, check out Pix4D vs Metashape vs WebODM vs RealityCapture.