
Your mission planner says 75%. Your quality report looks like Swiss cheese — red and orange blotches across the overlap map, holes in the point cloud, a DSM with spikes where the rooftop should be flat. What happened?
Image overlap drone mapping settings are among the most misunderstood parameters in the flight planning workflow. Pilots set 75% front / 60% side on day one, the first mission looks decent, and those numbers never get touched again. The problem is that 75/60 is the floor, not the target. It’s the minimum that works on a flat, well-lit, high-texture surface under ideal conditions. Real jobs are rarely all of those things at once.
I’ve seen this fail on a construction site survey where the building pad was 40 ft above the staging area — the planned overlap was fine, the effective overlap on the structures was not. The quality report told the story. The client got a reflight bill.
What Forward Overlap and Side Overlap Actually Mean
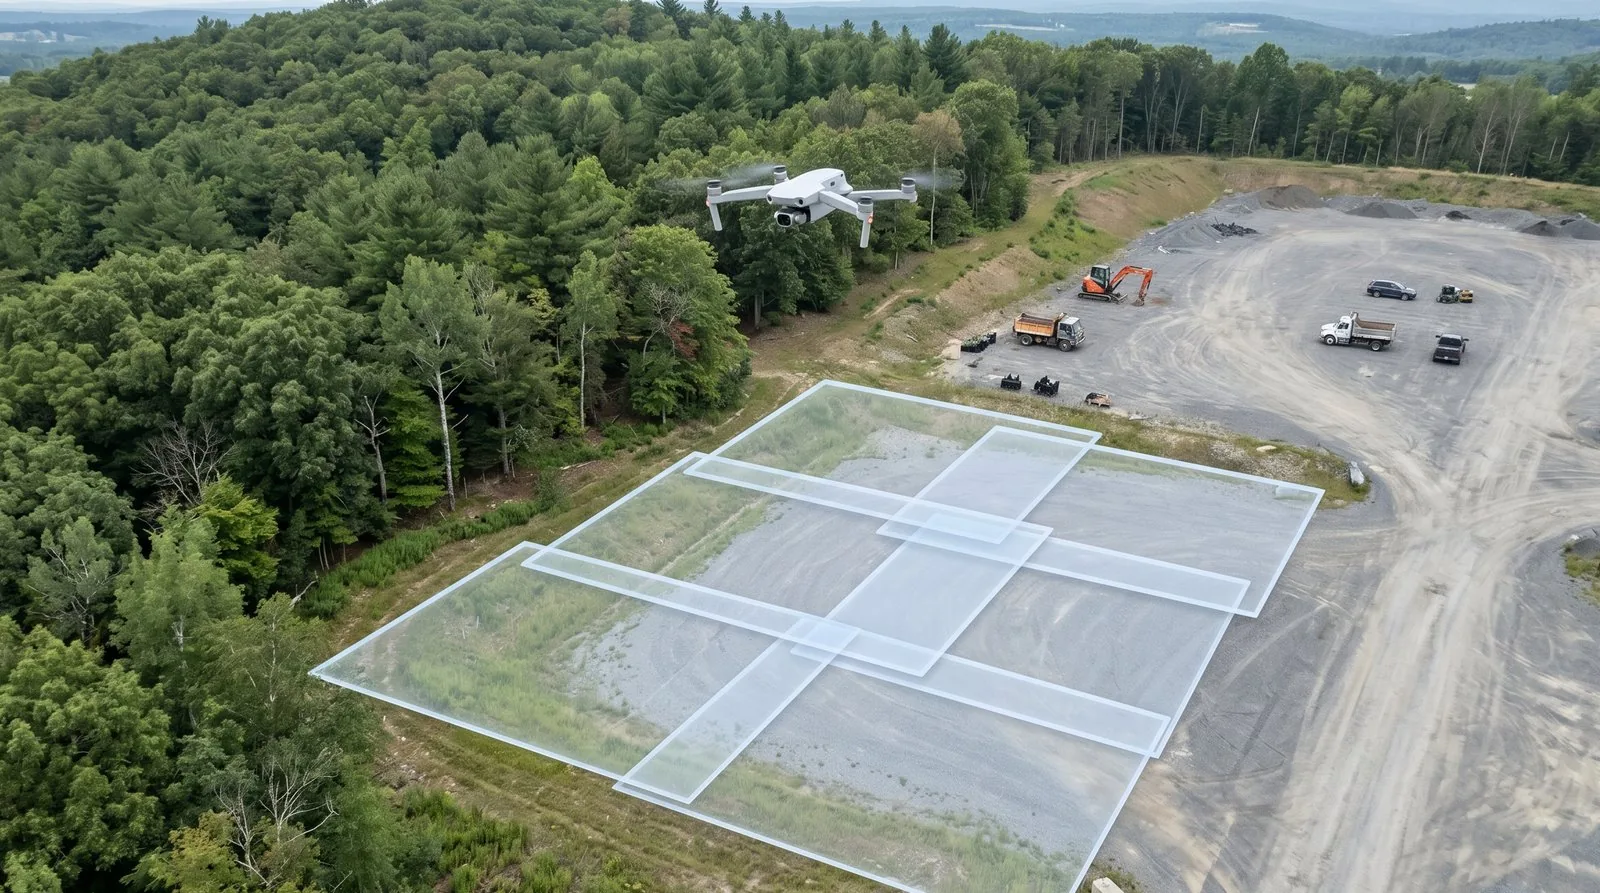
Forward overlap (also called frontal overlap or endlap) is the percentage of shared ground area between consecutive images taken along the same flight line in the direction of travel. At 80% forward overlap, the drone triggers a new image when it has moved forward only 20% of the image footprint length.
Side overlap (also called sidelap) is the percentage of shared area between images from adjacent parallel flight lines. Forward overlap is always set higher than side overlap — along-track, each ground point is seen from a single viewing direction, so you need more images to provide geometric diversity.
There’s also a physical constraint that caps forward overlap: the camera’s minimum trigger interval. Most consumer and prosumer mapping cameras need 1–2 seconds between shots. Forward overlap pushes trigger intervals down — if the math demands a shot every 0.8 seconds from a camera that can only do 1.5, you get lower effective overlap than planned.
The Math Behind Image Overlap Drone Mapping: GSD, Altitude, and Trigger Interval

Trigger Distance and Trigger Interval
For a given forward overlap setting, the drone must trigger when it has traveled:
Trigger distance = Footprint length × (1 - forward overlap)
At 75% overlap on a 225 ft footprint: 225 × 0.25 = 56 ft between triggers. At 85% overlap: 225 × 0.15 = roughly 34 ft.
Trigger interval = Trigger distance / Ground speed
At 20 mph (~30 ft/s) and 56 ft trigger distance: 56 / 30 = 1.87 seconds. At 85% overlap and the same speed: 34 / 30 = 1.1 seconds. If your camera’s minimum interval is 1.5 seconds, you’re past the hardware limit. The actual overlap will be lower than planned — and the quality report will tell you after the fact.
What Actually Fails When Overlap Is Too Low
Structure from Motion (SfM) works by finding matching features across overlapping images — tie points — then using those matches to triangulate 3D position.
Tie Point Starvation is the primary failure mode. When overlap drops, each ground point appears in fewer images. The bundle adjustment becomes unstable. GCP residuals increase. The point cloud develops holes.
Pix4D’s quality report overlap map:
- Green: Each pixel visible in 5 or more images. Target.
- Yellow/Orange: 2–4 images per pixel. Marginal.
- Red: Critical. Expect holes, alignment failures, or garbage.
Doming and Warping: When overlap is marginal, the bundle adjustment may appear to succeed while producing a subtly wrong model. Low overlap reduces the constraint network, and nadir-only flights with marginal overlap are especially prone to doming. GCPs help correct the final model, but they can’t fix a bundle adjustment that was geometrically underconstrained.
Edge Artifacts: The perimeter of any survey area receives less overlap coverage than the interior. At minimum overlap settings, edges are often blurry, misaligned, or missing. The standard fix: extend the planned grid 1–2 image footprint widths beyond the actual deliverable boundary.
Terrain Relief Changes Your Effective Overlap

Overlap is calculated based on altitude above the takeoff point, not above the actual terrain at every moment.
Set a 200 ft AGL mission from a parking lot at the base of a site. There’s a 50 ft building on site. The drone flies 200 ft above the parking lot — 150 ft above the rooftop. Image footprints scale linearly with altitude, so over that roof the footprint is 150/200 = 75% of what it is over flat ground. Planned 75% overlap may drop to 65–68% effective overlap over that roof.
Mitigations:
- Terrain-following flight mode. DroneDeploy, DJI Pilot 2, UgCS, and Mission Planner all support terrain-aware missions.
- Build in a buffer. If the site has 30+ ft of relief on a 200 ft AGL flight, increase base overlap to 80–85%.
- Double grid. A second pass at 90 degrees partially compensates for reduced effective overlap.
A practical rule: if relief exceeds 15–20% of your planned AGL, either use terrain following or manually bump overlap by 5–10 points.
When to Increase Overlap: The Decision Triggers
Dense Vegetation and Forest — Pix4D’s documented recommendation: 85% forward / 85% side. Tree canopy moves in wind, shadow shifts between strips, understory requires more oblique coverage. This is the threshold their support docs say you need before reconstruction quality becomes reliable.
Sand, Snow, and Low-Texture Surfaces — No texture means no tie points. Pix4D’s documented recommendation: 85% forward / 70% side. Add GCPs on anything you can find.
Thermal Imagery — Thermal images are inherently low-texture. Pix4D’s documented recommendation: 85% forward / 85% side. Push higher for especially featureless thermal scenes (uniform rooftops, water-only coverage).
Survey-Grade Topographic Work — For survey-grade deliverables: 80–85% forward / 70–75% side. RTK and PPK positioning improve absolute accuracy, but SfM still needs tie points to converge.
Complex 3D Structures — Vertical faces don’t exist in nadir imagery. For as-built 3D models: fly a double grid with 80–85% overlap on each pass, combined with oblique passes at 60–70 degrees gimbal pitch.
Nadir, Oblique, and the Double Grid
Standard drone mapping is nadir — camera pointing straight down. It produces the most consistent ground coverage for 2D orthomosaics and flat terrain DSMs.
Oblique imagery tilts the camera off-nadir — typically 20–45 degrees for general mapping, 60–70 degrees for structural inspection. It captures building facades and terrain slopes that nadir passes miss. The tradeoff: higher overlap is required, image count increases substantially.
Best practice for combined workflows: fly nadir first for the orthomosaic deliverable, then add oblique passes for the 3D model. Process the nadir pass alone for the orthomosaic; use the full combined dataset for the 3D mesh.
Double grid / crosshatch: Two overlapping grid missions flown at 90 degrees to each other. Combining two moderate-overlap passes (around 70% each) produces effective multi-view coverage comparable to a single very-high-overlap grid, but with the added angular diversity that helps on tall structures and steep terrain. It’s the standard approach for construction sites with multiple structures, stockpile surveys, and any site with more than 20 ft of relief. The cost is roughly double the flight time and image count.
Reading Software Overlap Output

Pix4D: The quality report’s overlap map uses green / yellow / orange / red to show how many images cover each area. Green means 5+ images per pixel — the target. If your report shows significant orange, the dataset needs to be reflown before you deliver.
Agisoft Metashape: The processing report includes a coverage map. Metashape also includes a “Reduce Overlap” tool that automatically thins an over-collected dataset by selecting a representative subset of images — useful when you collected at 90/90 on a flat site and want to reduce processing time.
OpenDroneMap / WebODM: ODM’s OpenSfM phase produces a reconstruction report flagging areas where feature matching was incomplete. Users consistently report fragmented reconstructions below 65% overlap on complex sites. ODM processing flags like --feature-quality and --min-num-features can sometimes rescue marginal datasets — but they cannot generate tie points that don’t exist in the imagery.
Drone Mapping Overlap Settings by Job Type
| Job Type | Forward | Side | Notes |
|---|---|---|---|
| Real estate / marketing | 70–75% | 60–65% | Visual quality only. Single grid. |
| Construction monitoring (weekly) | 75–80% | 65–70% | Consistency flight-to-flight. 80/70 if earthworks on site. |
| Survey-grade topo | 80–85% | 70–75% | RTK/PPK or GCPs required. |
| As-built / BIM 3D model | 80–85% + double grid | 70–75% | Oblique passes required. |
| Agricultural / NDVI multispectral | 80% | 80% | Crop canopy movement demands redundancy. |
| Stockpile volume | 80% | 70–75% | Pile edges and slopes trigger terrain relief problem. |
| Forest / dense vegetation | 85% | 85% | Pix4D official documented minimum. |
| Sand / snow / low texture | 85% | 70% | Pix4D official documented minimum. |
| Thermal | 90% | 90% | Pix4D official documented minimum. |
For how overlap settings interact with speed, altitude, and camera settings, see Drone Mapping Flight Parameters. For a complete first mission, see First Orthomosaic in 90 Minutes.
Frequently Asked Questions
What is the minimum overlap for drone photogrammetry?
Pix4D documents the absolute floor as 60% forward / 30% side, but explicitly notes this is not recommended. In practice, most experienced pilots treat 75% forward / 60% side as the functional minimum for standard flat terrain. Anything less than that on a real job is a risk.
Does RTK eliminate the need for high overlap?
No. RTK improves the absolute position accuracy of each image’s camera center, which helps the bundle adjustment converge more accurately. It doesn’t replace image matching — SfM still needs tie points across overlapping images to reconstruct geometry. You need adequate overlap regardless of GPS accuracy.
Why does my Pix4D quality report show red areas even though I set 75% overlap?
Several causes: effective overlap may have dropped over elevated terrain, the camera’s trigger interval may have been the physical limit rather than your planned setting, wind may have caused a crab angle that reduced effective sidelap, or the surface had low texture where tie points couldn’t form regardless of coverage. Check the overlap map color distribution and cross-reference with terrain features on site.
What does the 5-images-per-point threshold mean in practice?
It’s Pix4D’s operational threshold for reliable reconstruction, shown as green on their quality report overlap map. A ground pixel visible in 5 or more images gives the bundle adjustment enough multi-view geometry to produce a solid point cloud. Below 5 images, reconstruction degrades progressively. Plan your overlap settings so the interior of the site stays consistently green.
How does a double grid affect effective overlap?
A second grid pass at 90 degrees to the first adds a second viewing direction across the entire site. Two passes at moderate overlap (around 70% each) produce effective coverage comparable to a single high-overlap grid, with added angular diversity that helps on tall structures. It roughly doubles flight time and image count.
When is 85% forward and 85% side actually worth the cost?
For forest and dense vegetation (Pix4D documented minimum), for thermal imagery (along with 90/90), for any survey-grade deliverable on complex terrain, and for as-built 3D models of structures with significant vertical geometry. For a flat residential lot or an agricultural field with no structures, 80/80 is usually sufficient and 85/85 adds processing overhead without meaningful quality improvement.
75% forward / 60% side is where you start, not where you stop. It works for flat terrain with good texture and visual-quality deliverables. It fails on forest canopies, sand and snow, complex structures, survey-grade work, and anywhere the site has significant terrain relief. Check the quality report after every mission before delivering. Green across the overlap map means the dataset is solid. Anything else means the data is telling you something the mission plan didn’t account for.