


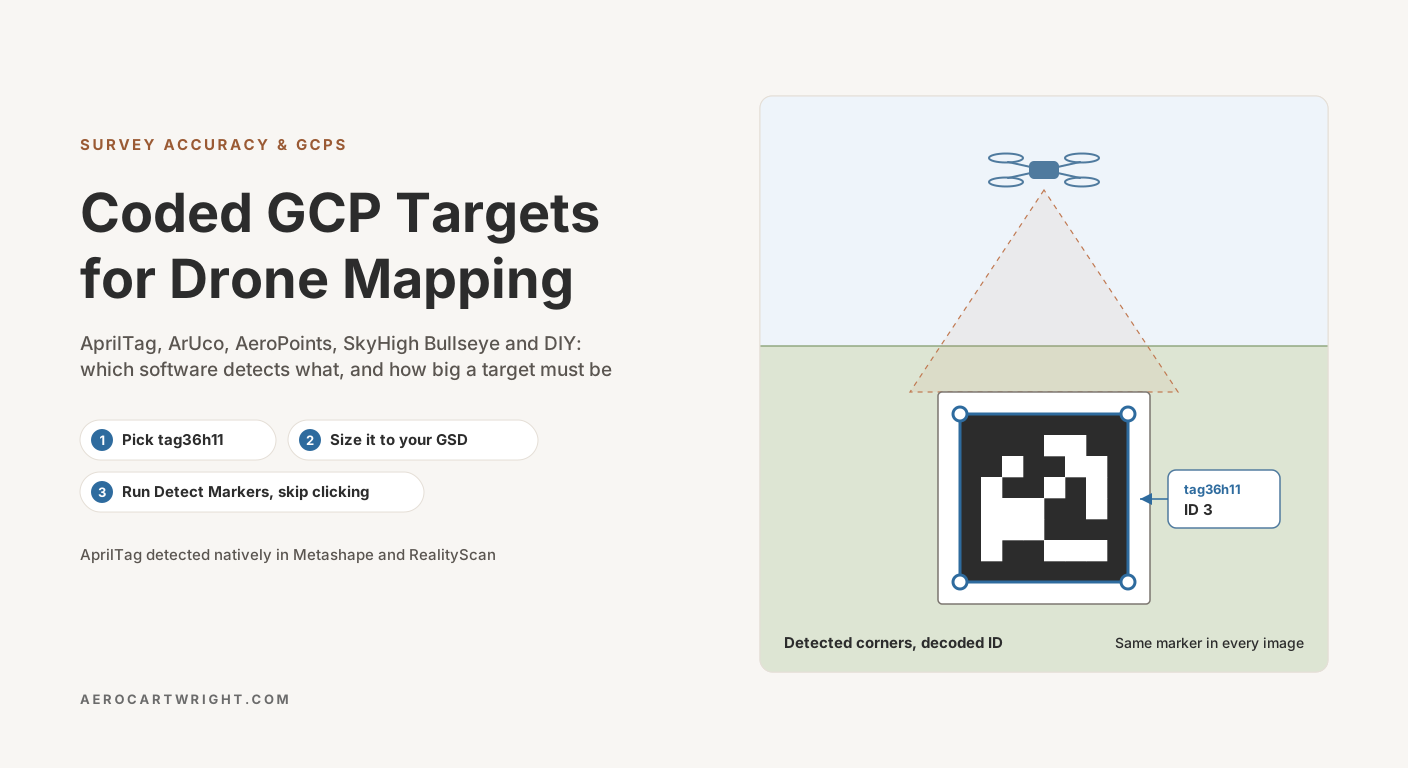
Picture a surveyor who has just flown a 90-acre site, driven back to the office and opened Metashape for the worst part of the day: twelve GCPs to mark across about 1,400 images. Each marker means clicking the same painted X on a dozen or more images before the software can constrain it. The work is mechanical, attention fades after the first few markers, and every misclick puts a bad observation into the adjustment.
The alternative is to let the software find the targets. Auto-detected coded targets (AprilTags, ArUco markers, or a vendor’s own patterns) carry a machine-readable ID, so the photogrammetry software can locate each one in every image where it appears and link the detections across the project. Agisoft’s own manual says automatic coded-target detection and marker placement “is more precise then manual marker placement” (Metashape 2.3 Professional manual, p. 107). Place the targets, survey their coordinates, run Detect Markers, and the clicking step largely disappears.
There is a catch the marketing rarely mentions: coded targets need a lot of pixels. The same Agisoft manual warns that aerial projects can demand targets too large to be practical, and suggests non-coded targets for aerial work. That makes target size, and therefore flight altitude, the deciding factor. Here is the full picture in 2026: which detection schemes work in which software, how big the targets must be, the commercial products, and the DIY path.
What Auto-Detection Actually Does
A coded target is a black-and-white pattern designed for machine detection. The pattern encodes a numeric ID. AprilTag’s tag36h11 family has 587 IDs; the smaller families have far fewer (tag16h5 has 30, tag25h9 has 35), according to the family definitions in the AprilRobotics source. OpenCV’s predefined ArUco dictionaries come in 50, 100, 250 and 1,000 IDs for each grid size from 4×4 to 7×7 (OpenCV aruco_dictionary.hpp). The detector finds candidate quadrilaterals in the image, decodes the interior pattern, checks the code against the family’s dictionary, and reports the corner positions with sub-pixel refinement.
In photogrammetry use, the detector gives you, per image:
- The numeric ID of each detected target
- The pixel position of the target’s center (and often its four corners)
Across a multi-image dataset, the software links detections of the same ID in every image where the tag was found. The result, fed into the bundle adjustment, is a marker supported by every image where detection succeeded, not only the handful a person would click.
The two open-source fiducial families that dominate are AprilTag and ArUco. They differ in detail but do the same job.
AprilTag vs ArUco
Both came out of computer vision and robotics research: AprilTag from the APRIL Robotics Laboratory at the University of Michigan, ArUco from the A.V.A. research group at the University of Córdoba.
AprilTag families are named by bit count and minimum Hamming distance: tag36h11 uses 36 data bits and any two valid codes differ in at least 11 bits, which lets the detector reject or correct misread bits. The AprilRobotics README actually recommends tagStandard41h12 for most new applications, but tag36h11 is the family that Metashape, RealityScan and OpenCV all list, so it is the safe choice for photogrammetry.
ArUco uses configurable dictionaries with smaller bit grids. Detection is built into OpenCV, which also includes the AprilTag 16h5, 25h9, 36h10 and 36h11 families as predefined dictionaries.
| Property | AprilTag (tag36h11) | ArUco (DICT_5X5_100) |
|---|---|---|
| Data bit grid | 6×6 | 5×5 |
| Total IDs | 587 | 100 (other sizes: 50 / 250 / 1,000) |
| Min Hamming distance | 11 | 7 |
| Listed in Metashape 2.3 manual | Yes | No |
| Listed in RealityScan Detect Markers | Yes | No |
| Detected by OpenCV | Yes (DICT_APRILTAG_36h11) | Yes |
| Free to generate and print | Yes | Yes |
Sources: tag36h11 IDs and Hamming distance from the AprilRobotics tag36h11.c; ArUco and OpenCV-AprilTag values from OpenCV’s dictionary header; software support from the Metashape 2.3 manual (p. 107) and RealityScan’s Detect Markers help.
For drone mapping, the software decides for you. Metashape (AprilTag since version 2.2, per Agisoft’s knowledge base) and RealityScan detect AprilTag natively; neither lists ArUco. Pix4D’s AutoGCP (PIX4Dmatic, PIX4Dcloud Advanced, PIX4Dengine) detects only Square, Diagonal and AeroPoint targets, not AprilTag or ArUco (Pix4D AutoGCP article). OpenDroneMap’s GCP documentation describes no automatic target detection (ODM docs). For Pix4D or ODM you run detection externally (OpenCV) and bring the results in.
Pick tag36h11 unless you have a reason not to, and use one family across all your projects.
Commercial Products
Several companies sell ready-made targets, from printed pads to GNSS-equipped smart targets.
Propeller AeroPoints. The premium option. Each AeroPoint is a 544 × 544 mm (about 21.4-inch) target weighing 1.5 kg with a built-in L1/L2 GNSS receiver (GPS, GLONASS, Galileo, BeiDou). Propeller states accuracy of 10 mm + 1 ppm horizontal and 20 mm + 1 ppm vertical (Propeller AeroPoints page). Leave them out for the flight, retrieve them, upload the logs, and Propeller post-processes them into surveyed coordinates. On Propeller’s store on 2026-10-02 a single unit was $1,000 and a 5-pack $5,000; no 10-pack was listed, so ten units cost 2 × $5,000 = $10,000. The first 12 months of the Propeller Corrections Network are included; after that it continues at no extra cost with a Propeller Platform license, or costs $1,000 a year standalone.
SkyHigh Bullseye. Printed vinyl targets with no GNSS and no encoded ID: checkerboard, iron-cross and weighted bull’s-eye patterns. On SkyHigh’s store on 2026-10-02, a six-pack of 24-inch checkerboard targets was $59.99 (about $10 each), six 48-inch checkerboard or iron-cross targets were $149.99, six weighted 24-inch bull’s-eye targets were $179.99, and ten 24-inch targets numbered 0–9 were $99.99. SkyHigh’s store listed no AprilTag products on 2026-10-02. You survey each target’s coordinates with a GNSS rover, and the software identifies each target by location, not by a code.
Pix4D Square and Diagonal targets. These are the black-and-white target types Pix4D’s AutoGCP detects. Pix4D’s sizing rule of thumb is a target diagonal of about 20 pixels; at an average GSD of 2.5 cm it recommends a 50 cm (20-inch) target (Pix4D AutoGCP article).
Specialty AprilTag suppliers. Optitag sells custom AprilTag prints on rigid materials in a choice of families, sizes and IDs; the configured variants on its store ranged from $70.92 to $310.70 on 2026-10-02. Check dimensional accuracy, and that the printed ID matches the family you will select in software, before using them on a paid project.
Custom-printed signs. Any sign shop can print an AprilTag image on coroplast, Dibond or aluminum at the size you need. Prices vary by shop, substrate and quantity, so get a local quote. The DIY workflow below uses this path.
For most operators the choice is between Propeller’s integrated GNSS-plus-target system and printed targets plus a separate GNSS rover for coordinates. The printed route costs tens to hundreds of dollars (two SkyHigh six-packs, enough for 12 targets, are 2 × $59.99 = $119.98) against $10,000 for ten AeroPoints.
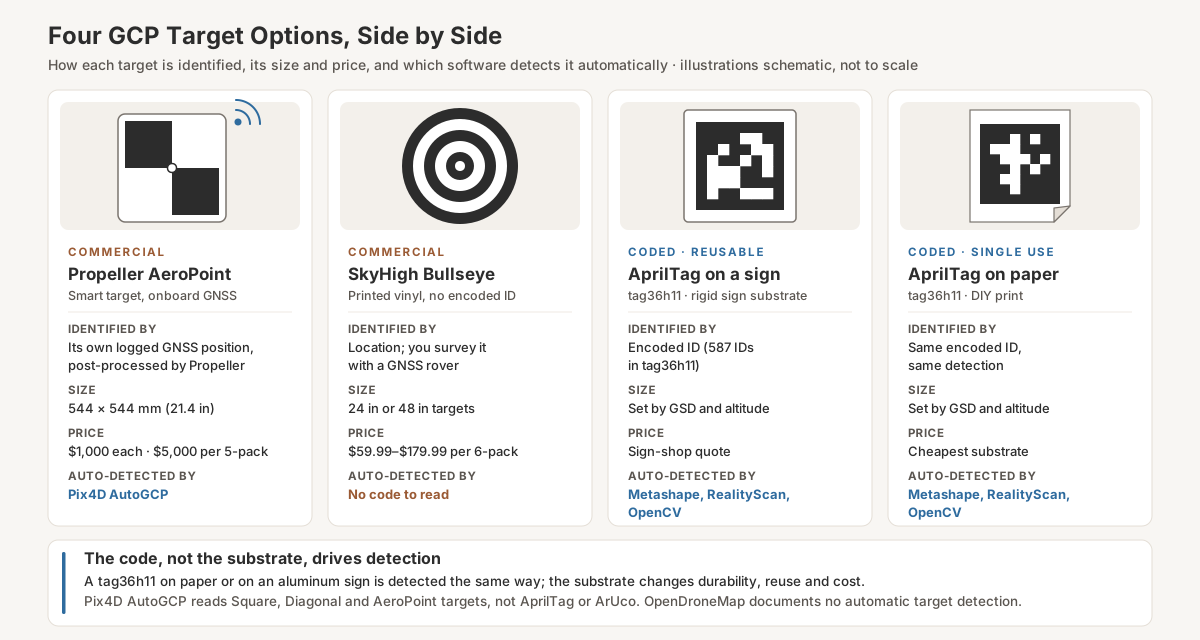
The Propeller AeroPoint Advantage
AeroPoints address a specific bottleneck: time on site setting up GCPs. With a traditional workflow, the operator:
- Places each marker on the ground
- Stands over the marker with a GNSS rover for 30–60 seconds, recording the position
- Repeats for every marker
As a planning estimate (not a timed test), 10 GCPs across a 50-acre site take something like 60–90 minutes, and the surveyor is tied up with the rover until it is done.
AeroPoints change the order of work. The operator places each unit, switches it on and moves on; the unit logs raw GNSS observations while it sits there. After retrieval, the logs are uploaded to Propeller. Propeller says results arrive in as little as 30 minutes for base-station-network users and within 24 hours of upload as standard (Propeller AeroPoints page).
Field time then shrinks to placing and retrieving the units. At an estimated 3–5 minutes per unit, ten AeroPoints take about 30–50 minutes, and some of that overlaps with flight preparation. Against 60–90 minutes for the rover workflow, that saves roughly 10 to 60 minutes per project (90 − 30 = 60 at best; 60 − 50 = 10 at worst).
The cost case, using those estimates and an assumed $75/hr fully burdened labor rate, for a business running 30 GCP-controlled projects a year:
- Time saved: 30 × 10–60 min = 300–1,800 min = 5–30 hours a year
- Value: 5–30 h × $75 = $375–$2,250 a year
- Best-case payback with corrections included (Platform license): $10,000 ÷ $2,250 = 4.4 years
- Best case with the $1,000/yr standalone corrections fee after year one: year one recovers $2,250, then $2,250 − $1,000 = $1,250 a year; ($10,000 − $2,250) ÷ $1,250 = 6.2 more years, so about 7.2 years in total
- At the low end ($375 a year) with corrections included: $10,000 ÷ $375 ≈ 27 years; if you pay the $1,000/yr standalone fee, the units never pay back on field labor alone
So the case for AeroPoints rests on more than field minutes: not needing a rover or a second person on the rover, Pix4D’s automatic AeroPoint detection, and integration with Propeller’s platform if you already pay for it. For a low-volume operator, printed targets win by a wide margin.
DIY Workflow
The DIY path uses free software and a sign shop. The core steps:
Step 1: Generate the markers. Use a free source: the apriltag-imgs repository for ready-made AprilTag images, OpenCV’s ArUco module for generating ArUco or AprilTag markers, or an online generator such as chev.me/arucogen. Use tag36h11 unless your software calls for something else. Generate more IDs than one project needs so you can replace damaged targets without reusing a number.
Step 2: Choose target size. GSD (ground sampling distance, the ground width one pixel covers) sets the minimum. Worked example with a DJI Phantom 4 Pro V2, whose spec page lists a 1-inch, 20 MP sensor, an 8.8 mm lens (24 mm equivalent) and 5,472 × 3,648 images (DJI Phantom 4 Pro V2 specs). The sensor width follows from the published focal lengths: 36 mm × 8.8 / 24 = 13.2 mm, a pixel pitch of 13.2 mm ÷ 5,472 = 2.41 µm. Then:
GSD = sensor width × altitude ÷ (focal length × image width) = 13.2 mm × altitude ÷ (8.8 mm × 5,472)
At 100 ft (30.48 m): 13.2 × 3,048 cm ÷ 48,153.6 = 0.836 cm/px.
In this article, a tag’s size means the width of its black square, the 8-module part the detector reads. The printed tag36h11 sheet, with its 1-module white border on each side, is 10 modules wide, so it is 10 ÷ 8 = 1.25 times wider: a 24-inch black square needs a 30-inch print.
| Flight altitude (AGL) | GSD (Phantom 4 Pro V2) | Pixels across a 24-inch (61 cm) black square | 8-pixel geometric floor | RealityScan’s 100-pixel guideline |
|---|---|---|---|---|
| 100 ft | 0.84 cm/px | 73 px | 6.7 cm (2.6 in) | 84 cm (33 in) |
| 200 ft | 1.67 cm/px | 36 px | 13.4 cm (5.3 in) | 167 cm (66 in) |
| 300 ft | 2.51 cm/px | 24 px | 20.1 cm (7.9 in) | 251 cm (99 in) |
| 400 ft | 3.34 cm/px | 18 px | 26.7 cm (10.5 in) | 334 cm (132 in) |
How the columns are built: GSD scales linearly with altitude (0.836 × 2, × 3, × 4). Pixels across = 60.96 cm ÷ GSD. The 8-pixel floor is the tag36h11 geometry: its black square is 8 modules wide (6 data bits plus a 1-module black border each side, per tag36h11.c), so if the black square spans fewer than 8 pixels, a module is smaller than a pixel and the code cannot be read; floor size (black square) = 8 × GSD. That is a hard limit, not a working size: a tag at the floor is far too small to decode reliably. The last column is 100 × GSD, from RealityScan’s recommendation that photographed markers be at least 100 pixels wide. Pix4D’s own rule for its AutoGCP targets is about 20 pixels across the diagonal (Pix4D).
The table explains Agisoft’s warning about aerial projects. A 24-inch black square meets RealityScan’s guideline at no altitude in the table; a 33-inch black square (about a 41-inch print, 33 × 1.25) meets it at 100 ft. If you want coded targets to detect reliably, fly the control-bearing flight low, make the targets as large as you can handle, and run a short test flight over one target before the real job. Part 107 caps altitude at 400 ft AGL unless the drone is flown within a 400-foot radius of a structure and no higher than 400 ft above the structure’s immediate uppermost limit (14 CFR 107.51(b)), which is why the table stops at 400 ft. Other cameras change the numbers; recompute GSD from your own camera’s sensor width, focal length and image width.
Step 3: Print on the right substrate.
- Paper: cheapest, single use, calm dry weather only.
- Coroplast or vinyl signs: a standard sign-shop product; reusable if stored flat.
- Aluminum or Dibond: the most durable and the flattest; worth it for permanent monitoring sites.
Print flat black on white. A glossy finish can throw glare on bright days, so choose matte. Keep the white margin around the black square: tag36h11 is designed as a 10-module-wide tag with an 8-module black square, so the white border is at least one module wide on each side (tag36h11.c). Do not trim into it.
Step 4: Survey the coordinates. Place each marker at its intended location. With an Emlid Reach RS3, Trimble R12 or any RTK GNSS rover, occupy each marker’s center for 30–60 seconds and log the coordinate. Record the marker ID with each coordinate (for example, “Tag 3 = 30.12345, -97.54321, 152.3 m”). This is the same step as for traditional GCPs.
Step 5: Process in photogrammetry software. Select the marker family you printed (sections below cover each tool). Import the surveyed coordinates as a CSV mapping marker ID to XYZ.
Step 6: Run the bundle adjustment. The software detects the targets, links them across images, applies the surveyed coordinates as control, and reports residuals.
DIY cost for a 12-marker set is twelve signs from your local sign shop plus stakes or weights, if you already own an RTK rover. Replace damaged signs as needed.
Detection Settings in Each Photogrammetry Tool
Software support matters more than the marker family. The current state in 2026:
Metashape
The strongest native support. Select Tools → Markers → Detect Markers (Agisoft), then choose the target type. According to the Metashape 2.3 Professional manual (pp. 107–108), the coded options are Agisoft’s circular targets (12, 14, 16 and 20 bit) and AprilTag in the families 16h5, 25h9, 36h10, 36h11, Circle 21h7, Standard 41h12 and Standard 52h13; the manual stresses selecting the same family you printed. Non-coded Cross and Circle targets are also detectable, with Tolerance and Maximum residual (pix) settings, but only after the cameras are aligned. Enable “Merge with existing markers” if the project already has markers with the same labels.
Metashape creates a marker for each detected ID. Load surveyed coordinates with the Import button on the Reference pane (or File → Import → Import Reference), and make sure the CSV labels match the marker names Metashape assigns.
The same manual cautions that coded targets “must take up a significant number of pixels” and that aerial projects “will demand too huge CTs,” recommending non-coded targets for aerial work. Take that seriously when you size targets.
Pix4D
Pix4D’s AutoGCP feature (in PIX4Dmatic, PIX4Dcloud Advanced and PIX4Dengine) auto-detects Square, Diagonal and Propeller AeroPoint targets, not AprilTag or ArUco (Pix4D AutoGCP article). If Pix4D is your processing tool, you have two paths:
- Use a Pix4D-supported target type. Deploy Square or Diagonal targets sized to about 20 pixels across the diagonal, or Propeller AeroPoints. Either auto-detects natively.
- External AprilTag detection. Run OpenCV across the imagery and use the detected pixel positions to place your GCP marks. Check your Pix4D product’s current documentation for how to bring marks in; this loses the in-tool convenience.
PIX4Dtagger, an older detection helper, shipped with PIX4Dmapper from version 2.2 to 4.5.6 and is no longer developed or supported (Pix4D).
RealityScan (formerly RealityCapture)
RealityScan’s Detect Markers tool detects its own circular markers (single ring, dual ring, legacy) and AprilTag families 16h5, 25h7, 25h9, 36h10 and 36h11 (RealityScan help). Detected markers are created as tie points; change their type to ground control points afterwards, or name control points in advance so detection fills them. RealityScan recommends markers at least 100 pixels wide in the photos and notes that large scenes require large markers.
OpenDroneMap / WebODM
The weakest link. ODM’s GCP documentation covers manual GCP identification and describes no automatic target detection. Options:
- External preprocessing. Run OpenCV-based detection across the image set and write ODM’s
gcp_list.txt: a first line with the projection, then one line per detection in the ordergeo_x geo_y geo_z im_x im_y image_name [gcp_name]. ODM uses these lines as GCP picks. A short Python script can do this. - Manual marker placement. The traditional workflow: pick each GCP in multiple images by hand. Slow.
Common Detection Failures
Coded targets fail for predictable reasons, and most of them can be fixed in the field.
Undersized targets. The target spans too few pixels at your GSD (see the size table). Detection finds nothing, or finds the tag in only some images. Fix: larger targets, or fly lower over the control.
Glare and specular reflection. The sun puts a hot spot on the target and the detector sees a white blob instead of a pattern. Fix: matte prints, avoid placing targets where they mirror the sun toward the flight path, and avoid very low sun.
Partial occlusion. Grass, debris or equipment covers part of the target. The detector needs the full black square and its white border. Fix: clear the area around each target, or put it on a flat backing board where vegetation is dense.
Motion blur. The drone moves during the exposure and smears the pattern. A common planning target is to keep the smear under one pixel: ground speed × shutter time ≤ GSD. At 100 ft with the Phantom 4 Pro V2 (0.84 cm GSD) and 18 mph (8 m/s), 1/1000 s gives 800 cm/s × 0.001 s = 0.8 cm of smear, just under one pixel; at 1/500 s it is 1.6 cm, about two pixels. Fix: a faster shutter, a slower flight speed, or both.
Print quality. Ink spread in cheap printing makes black areas bleed into white. The pattern is there, but the bits do not decode. Fix: use a sign shop, not a home inkjet on coated paper.
Curvature. The substrate curls in heat or wind, so the tag is no longer flat and its outline no longer matches the expected square. Fix: rigid substrates (Dibond, aluminum, coroplast) with corners staked or weighted.
Wrong family configured. The software is looking for tag16h5 but you printed tag36h11, so detection finds nothing. Fix: match the family in software to the print.
Wrong imagery. Optical fiducials need visible-light images. Do not expect a printed black-and-white tag to decode in thermal frames.
Field Workflow
Putting it together for a typical 50-acre project with 8 coded targets flown at 100 ft AGL:
Pre-flight (day before):
- Print or retrieve targets (8 vinyl-printed AprilTags with black squares of 24 inches or larger, so 30-inch prints; at 100 ft a 24-inch black square is about 73 pixels across with the Phantom 4 Pro V2, so test detection in your software before relying on it).
- Check the GNSS base and rover configuration, batteries and storage.
- Plan target locations and load them on the field tablet.
On site (flight day):
- Set up the GNSS base on its tripod over a known point (or let it average a position) and start sending corrections to the rover.
- Go to each target location. Place the target, secure it with stakes or weights, occupy the center with the rover for 30–60 seconds, log the coordinate and note the marker ID. Move to the next.
- Fly the mission.
- Optional: re-survey each target after the flight to confirm nothing moved. For sensitive sites, this is good practice.
- Retrieve targets.
Post-flight:
- Pull imagery off the drone.
- Compile the surveyed coordinates into a CSV (one row per marker ID, with X, Y, Z and a label matching the software’s marker names).
- Import to the photogrammetry software, run Detect Markers, import reference coordinates, run the bundle adjustment.
- Inspect residuals and re-process if needed.
The residual-checking loop is where coded targets save the most time. If a residual looks wrong in a manual workflow, you re-click the offending marker across several images. With coded targets, the detections stay put and you adjust only the input coordinate or the marker’s accuracy setting, so iterations are fast.
Realistic Time Savings
An illustrative comparison for a 1,200-image, 12-marker project. These are planning estimates, not a timed test; substitute your own numbers.
| Task | Manual marker placement | Auto-detected coded targets |
|---|---|---|
| Field placement of targets | 48 min (12 × 4 min) | 48 min (same) |
| Surveying coordinates | 30 min | 30 min (same) |
| Field subtotal | 78 min | 78 min |
| Loading imagery, initial alignment | 25 min | 25 min (same) |
| Marker placement / detection | 45–90 min (manual click) | 3–5 min (auto-detect) |
| Importing coordinates | 5 min | 5 min |
| Bundle adjustment | 15 min | 15 min |
| Inspecting and refining residuals | 15 min | 10 min |
| Post-flight subtotal | 105–150 min | 58–60 min |
| Per-project savings | — | 45–92 min |
Post-flight arithmetic: manual 25 + 45 + 5 + 15 + 15 = 105 min to 25 + 90 + 5 + 15 + 15 = 150 min; coded 25 + 3 + 5 + 15 + 10 = 58 min to 25 + 5 + 5 + 15 + 10 = 60 min. Savings range from 105 − 60 = 45 min to 150 − 58 = 92 min.
Across 30 projects a year, that is 30 × 45–92 min = 1,350–2,760 min, or about 22–46 hours of recovered office time, provided your targets are large enough to detect at the altitude you fly.
Bottom Line
Coded targets remove the slowest manual step in GCP-based drone mapping, and the bundle adjustment math is the same as with manually placed markers. The constraint is pixels: at typical mapping altitudes a target has to be large, or the control flight has to be low, before Metashape or RealityScan will detect it reliably.
Buy AeroPoints when: you already use Propeller’s platform, you would otherwise need a GNSS rover, or you process in Pix4D and want AutoGCP detection. On field-labor savings alone, the payback is 4.4 years in the best case and longer once corrections renew at $1,000 a year.
Buy SkyHigh Bullseye or similar printed targets when: you want durable ready-made targets and already have an RTK GNSS rover. They carry no encoded ID, so software identifies them by position rather than by code.
DIY AprilTag on printed signs when: you want the lowest-cost coded path, process in Metashape or RealityScan, and have a rover for the coordinates.
For the photogrammetry side: Metashape and RealityScan detect AprilTag natively; Pix4D detects its own Square and Diagonal targets and AeroPoints; ODM needs an external preprocessing step.
Clicking markers by hand is avoidable on most projects in 2026, as long as you size the targets for the altitude you fly.