



You just processed 400 images through WebODM with default settings. The orthophoto looks soft, the point cloud is sparse, and the DTM has holes where your client’s building pad should be. You ran the job overnight, waited eight hours, and the output is barely usable.
The defaults are a compromise. ODM ships settings that finish in reasonable time on modest hardware without crashing. That’s not the same as settings that produce deliverable-quality outputs. The difference between a mediocre result and a professional one lives in about a dozen parameters — and knowing when each one actually matters.
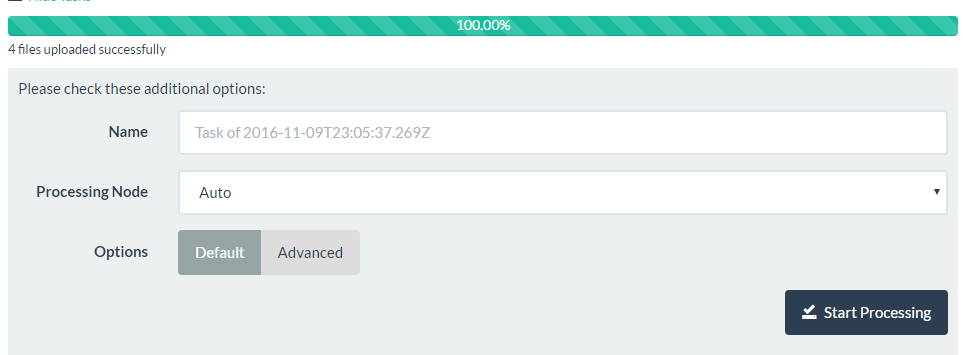
feature-quality, pc-quality, mesh-size, smrf-*, and the rest live. Screenshot from the OpenDroneMap/WebODM repository, used under AGPL-3.0.How ODM Processing Works — The 60-Second Version
Before adjusting anything, understand the pipeline. ODM processes images through a fixed sequence of stages:
- Feature extraction — identifies distinctive points in each image
- Feature matching — finds corresponding points across overlapping images
- Sparse reconstruction — builds a rough 3D point cloud from matched features
- Dense reconstruction — generates depth maps and a dense point cloud
- Meshing — creates a 3D surface mesh from the dense cloud
- Texturing — drapes imagery onto the mesh
- Georeferencing — applies coordinate reference system
- DEM generation — produces DSM and/or DTM rasters
- Orthophoto generation — creates the final orthorectified mosaic
Every parameter controls a specific stage. Cranking everything to “ultra” doesn’t make the output better — it makes stages 1-4 take 10 times longer while stages 7-9 produce identical results. Target the bottleneck, not the whole pipeline.
The Parameters That Actually Matter
feature-quality
What it does: Controls the resolution at which feature extraction runs. Options: ultra, high, medium, low, lowest. Default: high.
When to change it: Features are the anchor points that stitch your images together. If your dataset has poor overlap (below 70% frontal), bumping to ultra can recover matches that high misses. If overlap is solid (80%+), high is sufficient — ultra doubles memory consumption for marginal gains.
The real impact: Moving from high to ultra on a 500-image dataset adds 15-30 minutes of processing time. Moving from high to medium saves roughly the same. On well-flown missions with 80% frontal / 70% side overlap, I’ve never seen a measurable accuracy difference between high and ultra in the final orthophoto.
min-num-features
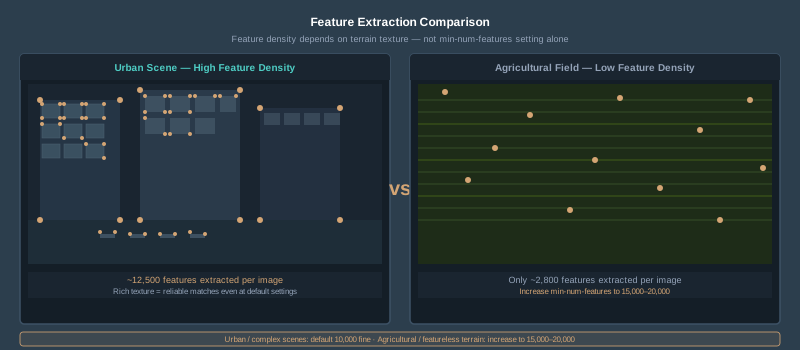
What it does: Sets the target number of features to extract per image. Default: 10000.
When to change it: Increase to 15000-20000 for featureless terrain — agricultural fields, water bodies, snow cover, dense uniform canopy. These landscapes don’t produce many natural keypoints, and the default extraction count may not find enough matches.
Leave it alone when: Your site has buildings, roads, varied vegetation, or any visual complexity. More features on already-rich imagery just increases matching time without improving alignment.
Common mistake: Setting this to 50000 because someone on a forum said “more is better.” Past about 20000, you’re extracting noise — edge artifacts, sensor patterns, compression blocks. These false features degrade matching accuracy and add hours of processing time.
matcher-type
What it does: Selects the algorithm for matching features across image pairs. Options: flann, bow, bruteforce. Default: flann.
The tradeoffs:
| Matcher | Speed | Reliability | Best For |
|---|---|---|---|
| flann | Medium | High | General use — most datasets |
| bow | Fast | Medium | Large datasets (1,000+ images), quick previews |
| bruteforce | Very slow | Highest | Difficult scenes, low overlap, critical accuracy |
When to change it: Switch to bow for datasets over 1,000 images where processing time matters more than squeezing out every match. Switch to bruteforce only when flann fails to reconstruct parts of your scene — you’ll know because chunks of your orthophoto will be missing or misaligned.
I use flann for 95% of jobs. The only time I switch to bruteforce is when a corridor mission (road, pipeline, power line) has alignment gaps — the linear geometry makes matching harder, and brute force recovers the missed connections.
pc-quality (Point Cloud Quality)
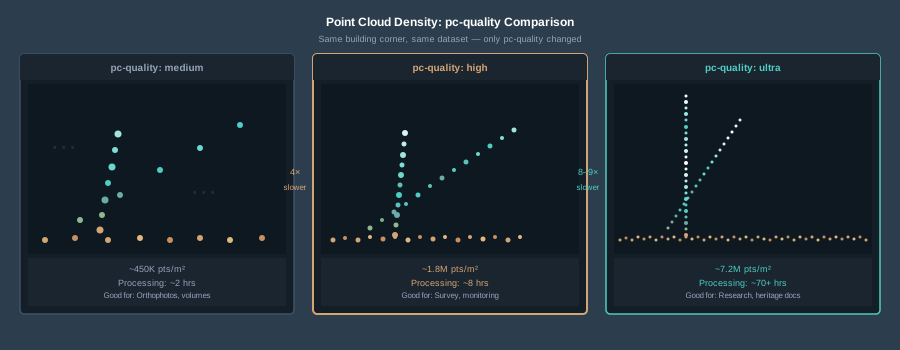
What it does: Controls the density of the dense point cloud reconstruction. Options: ultra, high, medium, low, lowest. Default: medium.
This is the single most impactful parameter for processing time. Each step up roughly quadruples computation time. A 500-image dataset that takes 2 hours at medium takes 8 hours at high and potentially 70+ hours at ultra. Community benchmarks confirm this — one user reported 9.5 hours at high versus 81 hours at ultra on a 1,308-image dataset. That’s an 8.5x increase.
When to use each level:
- lowest/low: Quick site check, same-day turnaround, verifying coverage before leaving the field
- medium: Standard deliverable — orthophotos, volumetric calculations, general mapping. This is the sweet spot for 90% of commercial work
- high: Survey-grade point clouds, detailed 3D models, construction monitoring where you need to measure fine structures
- ultra: Photogrammetric research, cultural heritage documentation, sub-centimeter dense cloud requirements. Rarely justified for commercial projects
The uncomfortable truth: For orthophoto-only deliverables, medium and high produce visually identical results. The dense cloud gets projected down to a 2D mosaic — all that extra density gets averaged away. Save high and ultra for when the point cloud itself is the deliverable.
depthmap-resolution
What it does: Sets the resolution of depth map images used to generate the dense point cloud. Default: 640.
When to change it: Increase to 1000-2000 for high-resolution cameras (40MP+) when you need maximum point density. This parameter works alongside pc-quality — increasing both multiplies processing time geometrically.
The practical limit: Your depth map resolution is bounded by your image resolution and the GSD you flew at. Setting depthmap-resolution to 4000 on images with a 3 cm GSD doesn’t create sub-centimeter point spacing — it creates interpolated noise at sub-centimeter spacing. Match this parameter to your actual data quality.
mesh-size
What it does: Sets the maximum vertex count of the 3D mesh. Default: 200000.
When to change it: Increase to 300000-600000 for urban scenes where you need accurate building and rooftop geometry in the 3D model. For rural terrain mapping where the mesh is just an intermediate step to the orthophoto, the default is fine.
Common mistake: Setting mesh-size to millions of vertices for a flat agricultural field. The mesh reconstruction will try to honor that vertex budget, creating unnecessary detail on flat ground while burning memory. Match the complexity to the terrain.
mesh-octree-depth
What it does: Controls the level of detail in 3D mesh reconstruction. Higher values produce finer detail. Default: 11. Range: 1-14.
When to change it: Increase to 12-13 for complex urban scenes or cultural heritage documentation where building edges and fine structures matter in the 3D model. Decrease to 9-10 for terrain-only work.
Each increment roughly doubles the face count. Going from 11 to 13 quadruples mesh complexity and the associated processing time.
DEM and Terrain Parameters
dsm and dtm Flags
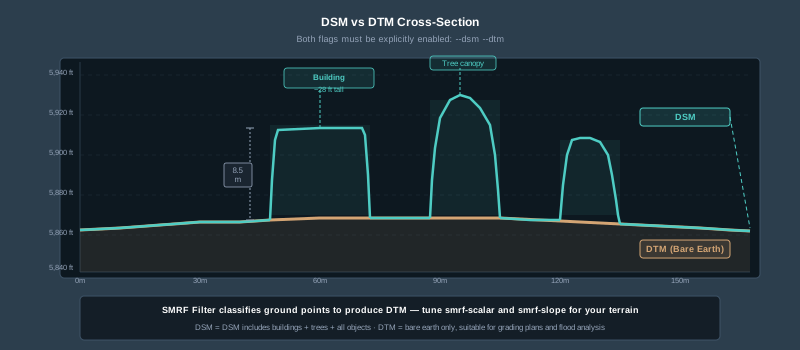
What they do: --dsm generates a Digital Surface Model (includes buildings, trees, everything). --dtm generates a Digital Terrain Model (bare earth only). Neither is generated by default — you must explicitly request them.
Common mistake: Processing an entire dataset, realizing you forgot --dtm, and reprocessing from scratch. Use --rerun-from odm_dem to regenerate DEMs without reprocessing the entire pipeline. This saves hours.
dem-resolution
What it does: Sets the output resolution of DEM rasters in cm/pixel. Default: 5 (5 cm/pixel).
When to change it: For survey-grade topographic work, match this to your GSD or slightly coarser. If you flew at 2.5 cm GSD, a dem-resolution of 2.5-5 is appropriate. Setting it finer than your GSD creates false precision — a smooth interpolation that looks detailed but contains no real elevation data below your capture resolution.
For volumetric calculations on stockpiles, 5 cm is typically sufficient. For grading plans and construction monitoring, 2-3 cm captures meaningful surface variation.
dem-gapfill-steps
What it does: Number of progressive DEM layers used to fill gaps. Default: 3.
When to change it: Increase to 4-5 for urban scenes where the SMRF filter removes buildings and leaves large holes that need interpolation. In forested areas, increasing this helps fill gaps beneath canopy where ground points are sparse.
smrf-scalar
What it does: Scaling value for the Simple Morphological Filter used to classify ground points for DTM generation. Default: 1.25.
When to change it: Increase for terrain with significant height variation — hilly sites, bluffs, steep slopes. A value of 1.5-2.0 handles moderate terrain; 2.5+ for mountainous areas. If your DTM has artificial plateaus where the filter clipped real terrain features, the scalar is too low.
smrf-slope
What it does: Slope tolerance for ground classification. Default: 0.15. Range: 0.1-1.2.
When to change it: Increase to 0.3-0.5 for steep terrain where the default rejects actual ground points on slopes. If your DTM shows jagged artifacts on hillsides, the slope tolerance is too tight.
smrf-threshold
What it does: Minimum height (in meters) expected for non-ground objects. Default: 0.5.
When to change it: Increase to 1.0-2.0 if low vegetation (shrubs, tall grass) is being classified as ground and creating bumpy DTM surfaces. Decrease to 0.3 for flat sites where even small objects (curbs, survey markers) should be filtered.
smrf-window
What it does: Window radius (in meters) corresponding to the largest feature to be removed. Default: 18.0.
When to change it: Increase to 25-30 for sites with large buildings or tree stands. If buildings are punching through your DTM as ground, the window is too small to capture their footprint.
| Terrain Type | smrf-scalar | smrf-slope | smrf-threshold | smrf-window |
|---|---|---|---|---|
| Flat open field | 1.25 | 0.15 | 0.5 | 18 |
| Gentle rolling hills | 1.5 | 0.25 | 0.5 | 18 |
| Urban with buildings | 1.25 | 0.15 | 1.0 | 25 |
| Steep forested terrain | 2.0 | 0.5 | 1.5 | 25 |
| Mountain / canyon | 2.5 | 0.8 | 2.0 | 30 |
Orthophoto Parameters
orthophoto-resolution
What it does: Sets the output orthophoto resolution in cm/pixel. Default: 5 (5 cm/pixel).
When to change it: Match this to your GSD. If you flew at 2 cm GSD, set orthophoto-resolution to 2. Setting it finer than your GSD creates upsampled pixels — sharper-looking but not more accurate. Setting it coarser than your GSD discards real data.
For deliverables: Most clients expect orthophotos at native GSD. Construction monitoring at 1-2 cm, general site mapping at 3-5 cm, large area surveys at 5-10 cm.
crop
What it does: Automatically crops the orthophoto by creating a boundary buffer shrunk by N meters from the dataset edge. Default: 3.
When to change it: Set to 0 to disable cropping if you need full edge-to-edge coverage. Increase to 5-10 if edge distortion is unacceptable — the periphery of any photogrammetric reconstruction is the weakest area, and cropping removes the worst of it.
fast-orthophoto
What it does: Skips dense reconstruction and 3D model generation entirely. Generates an orthophoto directly from the sparse reconstruction.
When to use it: Field verification — process on a laptop at the site to confirm coverage before packing up. Same-day client previews. Any scenario where you need a quick look and don’t need point clouds, meshes, or DEMs.
Processing time impact: 5-10x faster than a full pipeline run. A 400-image dataset that takes 3 hours normally finishes in 20-30 minutes.
What you lose: Point cloud, 3D mesh, DSM, DTM, and some orthophoto accuracy in areas with significant elevation change. The sparse reconstruction doesn’t correct for terrain displacement as well as the dense pipeline.
Three Presets for Real Work
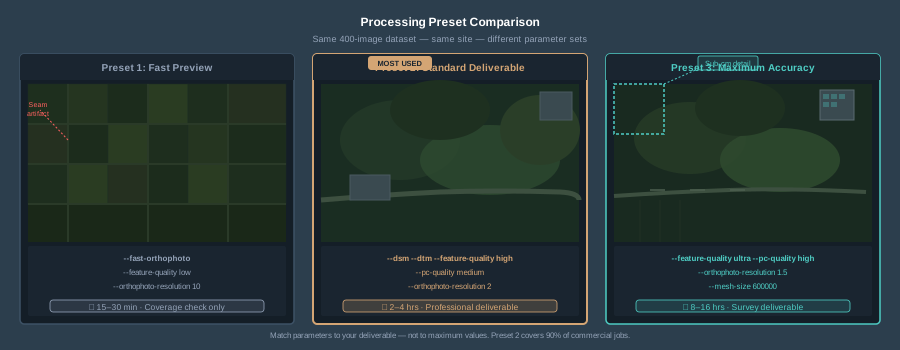
Preset 1: Fast Preview
Use this at the field site on a laptop to verify coverage before you leave.
--fast-orthophoto
--feature-quality low
--orthophoto-resolution 10
--crop 0
Processing time: ~15-30 minutes for 400 images on a modern laptop. What you get: A rough orthophoto to confirm full coverage and check for obvious gaps. Not deliverable quality — just a sanity check before you drive two hours back to the office.
Preset 2: Standard Deliverable
This is what I run for 90% of commercial mapping jobs — orthophotos, volumetrics, site documentation.
--dsm
--dtm
--feature-quality high
--pc-quality medium
--orthophoto-resolution 2
--dem-resolution 5
--mesh-size 200000
--crop 3
Processing time: ~2-4 hours for 400 images on a workstation (32GB RAM, 8-core CPU). What you get: Clean orthophoto at native GSD, usable DSM/DTM, adequate point cloud for volumetric calculations. Professional quality for most client deliverables.
Preset 3: Maximum Accuracy Survey
For survey-grade work, construction monitoring with sub-centimeter requirements, or detailed 3D documentation.
--dsm
--dtm
--feature-quality ultra
--pc-quality high
--min-num-features 12000
--orthophoto-resolution 1.5
--dem-resolution 2
--mesh-size 600000
--mesh-octree-depth 12
--crop 5
Processing time: ~8-16 hours for 400 images on a workstation. What you get: Dense point cloud suitable for cross-sections and detailed measurement, high-resolution DEMs for grading analysis, sharp orthophoto. This is what goes to the surveyor or engineer.
Note: I don’t use pc-quality ultra in production. The jump from high to ultra adds 4-8x processing time for diminishing returns that rarely justify the overnight compute. If you need ultra-dense point clouds, consider whether LiDAR is the right tool instead.
Common Mistakes That Waste Time or Degrade Quality
Running ultra everything on a standard mapping job. The most common waste. pc-quality ultra with feature-quality ultra on a 500-image dataset can run for 3-4 days. The orthophoto won’t look meaningfully different from high/medium. Match parameters to deliverables.
Forgetting —dsm or —dtm. ODM doesn’t generate DEMs by default. Discovering this after a 6-hour processing run means either reprocessing or using --rerun-from odm_dem — which at least saves the dense reconstruction. Learn this once, remember it forever.
Setting orthophoto-resolution finer than GSD. If you flew at 3 cm GSD and set orthophoto-resolution to 1, you get a larger file with interpolated pixels. No additional detail. The camera captured 3 cm — the software can’t invent what isn’t there.
Ignoring SMRF parameters for DTM work. The defaults work for flat, open terrain. Anything with significant vegetation, buildings, or slope variation needs tuned SMRF values. A DTM full of artifacts is worse than no DTM — your client will measure wrong elevations from it.
Using —split on small datasets. The --split parameter divides large datasets into chunks for processing. On datasets under 500-800 images, splitting adds overhead and can create visible seam artifacts at chunk boundaries. Only use it when you need it — typically 1,000+ images or when memory is the constraint.
Not using —rerun-from when iterating. If you’re adjusting DEM or orthophoto parameters, you don’t need to reprocess the entire pipeline. --rerun-from odm_dem regenerates DEMs and orthophotos from the existing point cloud. --rerun-from odm_meshing regenerates everything from the mesh stage forward. This turns a 4-hour reprocess into 20 minutes.
Hardware Considerations
Processing parameters don’t exist in isolation — they interact with your hardware. General guidelines:
| RAM | Max Comfortable pc-quality | Typical Dataset Size |
|---|---|---|
| 16 GB | medium | Up to 300 images |
| 32 GB | high | Up to 600 images |
| 64 GB | high | Up to 1,500 images |
| 128 GB | ultra | 2,000+ images |
GPU acceleration: ODM supports GPU-accelerated depth map computation through OpenSFM. If you have an NVIDIA GPU with CUDA support, dense reconstruction runs significantly faster. This mostly affects the pc-quality stage.
Storage: A single processing run with pc-quality high on 500 images generates 20-40 GB of intermediate files. Budget accordingly and clean up old runs.
The default ODM settings are designed to finish without crashing on average hardware. They’re not designed to produce your best work. But “best” doesn’t mean cranking every slider to maximum — it means matching parameters to your deliverables, your terrain, and your hardware.
For most commercial mapping: feature-quality high, pc-quality medium, orthophoto and DEM resolution matched to your GSD, and properly tuned SMRF values if you need a DTM. That combination produces professional deliverables in 2-4 hours on a workstation.
Save the ultra settings for when the point cloud itself is the product. Save the fast preset for field verification. And always — always — use --rerun-from when you’re iterating on DEM or orthophoto parameters. The hours you save will pay for themselves by the end of the first week.