Part 1 of 6 in the Drone Mapping Checklist Series — one article per phase of a commercial drone survey, publishing every Friday.
What Goes Wrong Without a Pre-Flight Checklist
An operator arrives at a site near a small regional airport. He’s confident it’s Class G — he flew a site two miles away last month and didn’t need LAANC. He launches without checking the sectional chart or submitting a LAANC request. Mid-mission, DJI’s geofencing triggers a height restriction warning he didn’t expect. He continues the flight anyway, assuming it’s a database error.
Three weeks later: FAA enforcement letter. The site sits under a Class D surface area that extends to the surface. The height ceiling for that grid cell on the UAS Facility Map was 0 feet AGL — no LAANC authorization available at any altitude. He should have checked the UAS Facility Map before leaving the office.
Here’s the second one.
Firmware auto-updated overnight on the controller. The update reset the camera gimbal pitch parameters to factory defaults. The operator doesn’t notice because the camera still looks normal on the live feed. He flies a full 45-minute mapping mission. In processing, alignment fails on 30% of the images — the gimbal was pitched 2 degrees off from the planned nadir angle, and the overlap calculations assumed the planned angle. The edges of every image don’t match the expected positions. Result: partial refly. Another half-day on site, another mobilization cost the client didn’t budget for, another project timeline that slips.
These aren’t mistakes beginners make. These are experienced operators running on autopilot — the human kind — under time pressure. One skipped step. One unchecked assumption. Both produce outcomes that cost real money and real credibility.
A drone pre-flight checklist catches both issues in under 10 minutes. The airspace check takes two minutes on a phone. The firmware and gimbal verification takes three. The rest of the UAS pre-flight inspection covers equipment state and weather — items that DJI’s built-in checklist either skips entirely or handles with a generic “check your surroundings” prompt that means nothing specific.
The manufacturer’s checklist is designed to keep the aircraft from crashing. That’s a low bar. A mapping pre-flight checklist is designed to keep the data from being worthless. Different objective. Different list.
Site Assessment (Before You Leave the Office)
Everything in this section happens the day before or the morning of, before you drive to the site. The goal is simple: arrive on site with zero open questions about what you’re collecting, where you’re operating, and whether you have permission to be there.
-
Project specifications review. Pull the scope document. Confirm: deliverable type (ortho, DSM, contours, point cloud), accuracy class, required GSD, coordinate reference system, vertical datum. If you don’t know the CRS before you leave, you shouldn’t leave. Every downstream parameter — flight altitude, overlap, GCP deployment pattern — flows from these specs. Get them wrong at the office and you’ll discover the error in processing, when it’s too late.
-
Terrain reconnaissance. Open Google Earth or the client’s site plan. Identify: terrain relief (flat vs. steep — steep terrain requires higher overlap percentages), vegetation density (affects point cloud quality and GCP visibility), water features (photogrammetry fails on water without texture — plan your flight boundaries accordingly), power lines and tall structures (obstacle clearance for flight altitude planning), and access points (where you can park, where you can launch, where foot traffic to GCP locations is feasible). Fifteen minutes on Google Earth saves an hour of improvisation in the field.
-
Property and access permissions. Confirm you have written authorization to operate on the property. For government projects, confirm the task order or contract explicitly covers drone operations. For private property, get the landowner’s acknowledgment in writing — email is fine. This isn’t a formality. Operating on private property without permission creates liability that your drone insurance doesn’t cover. Trespass is a state-law issue, and your policy covers aircraft operations, not your decision to walk onto someone’s land.
-
Logistics. Drive time. Site access hours — some sites gate at 6 PM, some require badging, some lock out vehicles after hours. Number of batteries needed (calculate from mission plan acreage and platform endurance, then add one spare). Crew requirements — visual observer needed for obstructed line of sight or operations near the edge of VLOS distance. Equipment load list — every piece of gear, written down, checked off before the truck leaves.
Airspace and Regulatory Verification
This is the section that separates a Part 107 pre-flight checklist from a hobbyist’s quick glance at the sky. Every item here should be completed before departure.
In You Are a Professional Pilot. Act Like One, I covered why sectional charts are not optional for Part 107 operations. The pre-flight check is where that discipline becomes operational.
-
Sectional chart review. Pull the current sectional for the operating area at SkyVector or ForeFlight. Identify the airspace class: Class B, C, D, E, or G. Determine altitude ceilings and floors. If it’s anything other than Class G surface to 400 feet AGL, you need authorization. Don’t rely on the drone’s geofencing database — it lags behind chart updates and doesn’t account for the specific altitude boundaries that determine your legal ceiling.
-
LAANC authorization. If the site falls in controlled airspace, submit the LAANC request through your UAS Service Supplier app — Aloft, Airspace Link, or AutoPylot. Check the UAS Facility Map grid cell for your site. It tells you the maximum pre-approved altitude ceiling. If your mission requires altitude above that ceiling, submit a “further coordination” request at least 72 hours in advance. Do this from the office, not the field. LAANC approvals for standard grid ceilings are near-instant. Further coordination requests are not.
-
NOTAMs and TFRs. Check current NOTAMs and temporary flight restrictions at the FAA’s NOTAM search or through your LAANC app. Presidential movements, wildfire operations, sporting events, and military exercises create TFRs that override everything on the sectional. These change with little notice. Check them the morning of — not the night before.
-
Remote ID verification. Confirm your aircraft is broadcasting Remote ID. If you’re using a broadcast module — older platforms like the M300 RTK pre-firmware-update or the Phantom 4 RTK — verify the module is powered, paired, and transmitting before departure. A non-broadcasting aircraft is a non-compliant aircraft.
-
ADS-B awareness plan. Determine how you’ll monitor manned aircraft traffic during the operation. Options: built-in drone receiver (M350 RTK), portable ground station (uAvionix pingStation, Stratux), or web-based tracking (FlightRadar24, FlightAware). Have it set up and tested before you arrive on site. Not after. Not during the first battery.

Weather Assessment
Weather is not a judgment call. It’s numbers against thresholds. Here are the numbers.
-
Wind speed. Check current and forecast winds at flight altitude for your operating window. Platform limits: DJI M350 RTK — 27 mph (12 m/s) max resistance. DJI Mavic 3 Enterprise — 27 mph (12 m/s). DJI Mini 4 Pro — 24 mph (10.7 m/s). These are manufacturer maximums — the speed at which the aircraft can hold position, not the speed at which it produces clean data. For mapping, sustained winds above 50-60% of the platform’s max resistance degrade image quality through motion blur and platform instability. Practical mapping limits: 15-20 mph for enterprise platforms, 10-15 mph for consumer. If you’re fighting to hold altitude and heading, your images show it.
-
Cloud ceiling. You need sufficient ceiling for your flight altitude plus margin. At 250-400 feet AGL, a 500-foot ceiling is technically legal but leaves no room for error. If the ceiling is dropping, delay. For photogrammetry specifically, overcast skies are often better than direct sun — uniform lighting reduces shadow artifacts in orthomosaics and eliminates the harsh contrast gradients that confuse feature matching algorithms.
-
Precipitation. No rain. Period. Most commercial drones are not rated for precipitation. The M350 RTK is IP55-rated and handles light rain in an emergency — that doesn’t mean you should plan to fly in it. Most other platforms have no ingress protection rating at all. Moisture on the lens destroys data quality, and water in the gimbal motor creates a maintenance problem that outlasts the rain. If rain is forecast within your operating window, delay or reschedule. You cannot dry a lens mid-flight.
-
Temperature and battery performance. LiPo batteries lose 10-20% capacity below 40°F (4°C). Below 32°F (0°C), capacity loss exceeds 30%, and battery voltage sag increases the risk of a mid-flight low-voltage warning that forces an unplanned landing. Cold weather protocol: pre-warm batteries in the vehicle with heat running, plan shorter flight times (reduce planned mission time by 20-30%), carry extra batteries. In extreme heat — above 95°F (35°C) — battery swelling and motor overheating become the risks. Monitor temperatures between flights. A battery that’s hot to the touch after landing needs to cool before the next flight, not go straight back in the aircraft.
-
Visibility. Part 107 requires 3 statute miles visibility from the control station. This isn’t “it looks clear out” — it’s a specific distance. Fog, haze, smoke, and dust reduce visibility below minimums, especially in early morning conditions that look like they’ll burn off but haven’t yet. If you can’t see 3 statute miles, you can’t fly. Wait for it to clear. If it doesn’t clear within your operating window, that’s a scrub. Pack up.

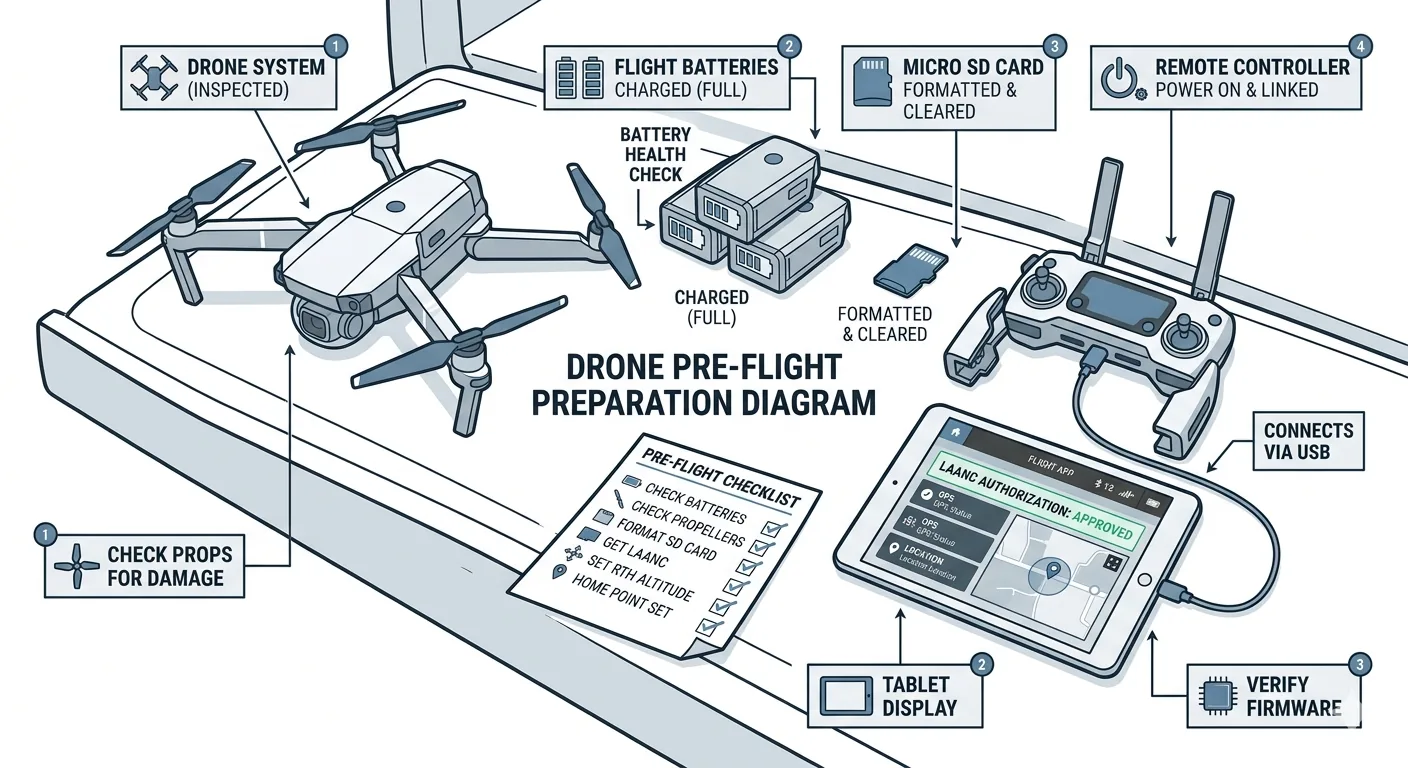
Equipment Verification
On-site, before the first launch. This is the drone mapping pre-flight that catches equipment-level failures — the items that turn a mobilization into a wasted trip.
-
Battery state. All flight batteries fully charged. Check charge cycle count — most manufacturers recommend retirement at 200-300 cycles. Inspect for swelling, discoloration, or physical damage on every battery. Controller battery charged. Tablet or phone charged. Portable ADS-B receiver charged (if applicable). RTK base station battery charged. One dead battery in the chain delays the entire operation.
-
SD card and storage. Card formatted — full format, not just files deleted. A quick format leaves file system fragmentation that causes write errors during high-speed burst capture. Capacity verified: a 45-minute mapping flight on an M350 RTK with the P1 camera at 45MP produces 25-35 GB of imagery. A 64 GB card covers a single long mission. A 128 GB card gives you margin. Carry a spare. Verify the card is fully seated — a partially inserted card appears functional during preflight but drops images mid-flight. You won’t know until processing.
-
Firmware version. Check the aircraft, controller, and battery firmware versions against your last known configuration. If any component updated since your last flight — DJI auto-update is aggressive and defaults to on — verify that no settings were reset. Firmware updates on DJI platforms have historically reset gimbal calibration parameters, RTK base station configurations, obstacle avoidance sensitivity, and return-to-home altitude. This is the scenario from the opening of this article. Check the version. Check the settings. Every time.
-
Gimbal calibration. Run the auto-calibration routine on a flat, level surface before launch. Verify pitch angle matches the mission plan: -90° for nadir mapping, -70° to -80° for oblique capture. A 2-3 degree pitch deviation doesn’t look wrong on the live feed — the preview image appears normal to the eye. But it shifts the image footprint enough to break the overlap geometry your mission plan assumed. The result is alignment failure in processing on 20-40% of images, concentrated at the edges of the survey area where overlap is already at minimum.
-
Propellers. Inspect all propellers for cracks, chips, warping, or loose mounting. Run your finger along the leading edge — damage you can’t see at a glance, you can feel. This is in every manufacturer’s pre-flight checklist for a reason. A propeller failure at 250 feet AGL over a job site with people present is not an inconvenience — it’s an incident, a potential injury, and an FAA report.
-
RTK/GNSS status (if applicable). If using an RTK-equipped drone: power on the base station or confirm your NTRIP connection to a CORS network. Wait for a fixed solution — not float, not single, fixed. Verify the base station CRS matches the project specification. A base station broadcasting in WGS84 while your project requires NAD83(2011) produces coordinates that are internally consistent but offset from ground truth by 1-2 meters. Confirm the correction link is active — radio or cellular. Check satellite count and PDOP. Fixed solution with PDOP under 2.0 before you launch. If you can’t get a fix, troubleshoot on the ground, not in the air.
-
Remote ID broadcast. Confirm the aircraft is broadcasting before takeoff. Use the FAA’s Remote ID app, OpenDroneID, or any smartphone-based receiver to verify the broadcast. This takes 30 seconds. Do it every flight.
-
Obstacle avoidance settings. Verify obstacle avoidance is configured for the mission type. Over open terrain, leave it active — it’s a safety net with no downside. Near structures, trees, or steep terrain, you may need to adjust or disable specific directional sensors to prevent the aircraft from deviating from planned flight lines. An M350 RTK that senses a tree canopy 30 feet below the flight path will brake and climb if downward avoidance is set to aggressive — mid-mission, mid-flight-line, ruining the consistent altitude your photogrammetry needs. Document any changes to obstacle avoidance settings in your flight log.

The Complete Pre-Flight Checklist
Everything above, condensed into one table. Print it. Laminate it. Put it on a clipboard. Run through it every flight, no exceptions.
| Phase | Item | ✓ |
|---|---|---|
| Office/Planning | Project specs reviewed: deliverable type, accuracy class, GSD, CRS confirmed | ☐ |
| Office/Planning | Terrain reconnaissance: relief, vegetation, water, obstacles, access points reviewed | ☐ |
| Office/Planning | Property/access permission: written authorization confirmed | ☐ |
| Office/Planning | Logistics: drive time, site hours, battery count, crew, equipment list confirmed | ☐ |
| Office/Planning | Mission plan built: altitude, overlap, flight lines matched to project specs | ☐ |
| Airspace & Regulatory | Sectional chart reviewed: airspace class and altitude boundaries identified | ☐ |
| Airspace & Regulatory | LAANC authorization submitted and approved (if controlled airspace) | ☐ |
| Airspace & Regulatory | NOTAMs and TFRs checked morning of flight | ☐ |
| Airspace & Regulatory | Remote ID broadcasting and verified | ☐ |
| Airspace & Regulatory | ADS-B monitoring solution set up and tested | ☐ |
| Weather | Wind speed within mapping limits (15-20 mph enterprise, 10-15 mph consumer) | ☐ |
| Weather | Cloud ceiling adequate for flight altitude with margin | ☐ |
| Weather | No precipitation in operating window | ☐ |
| Weather | Temperature assessed: battery performance adjusted if below 40°F or above 95°F | ☐ |
| Weather | Visibility confirmed at 3 statute miles or greater | ☐ |
| Equipment | All batteries charged and inspected (flight, controller, tablet, base station) | ☐ |
| Equipment | SD card formatted (full format), capacity verified, spare available | ☐ |
| Equipment | Firmware versions checked: no unexpected updates or settings resets | ☐ |
| Equipment | Gimbal calibrated on flat surface, pitch angle matches mission plan | ☐ |
| Equipment | Propellers inspected for damage: cracks, chips, warping, mounting | ☐ |
| Equipment | RTK/GNSS: fixed solution, CRS verified, PDOP under 2.0, correction link active | ☐ |
| Equipment | Remote ID broadcast confirmed via receiver app | ☐ |
| Equipment | Obstacle avoidance configured for mission type, changes documented | ☐ |
Download the Pre-Flight Checklist PDF
Get the complete drone pre-flight checklist as a printable, laminate-ready PDF. Designed for a clipboard, not a desktop.
Download the Pre-Flight Checklist →
This is part 1 of the 6-part Drone Mapping Checklist Series. Next: Mission Planning Checklist — the parameters that actually control your results.